The U.S. Consumer Product Safety Commission (CPSC) estimates that in 1998, clothes dryers were associated with 15,600 fires, which resulted in 20 deaths and 370 injuries. Fires can occur when lint builds up in the dryer or in the exhaust duct. Lint can block the flow of air, cause excessive heat build-up, and result in a fire in some dryers.
According to data gathered between 1999 and 2002 by the National Fire Protection Association (NFPA), 4 % of all reported structural fires involved a clothes dryer [1].
Dryer Fires : 1999 - 2002 [1]
| Causes of Dryer Fire | |
| Failure to Clean | 30% |
| Electrical Failure | 21% |
| Mechanical Failure | 19% |
| Other | 30% |
| Electrical Failures | |
| Wire Insulation Short | 4% |
| Short Circuit | 4% |
| Automatic Controls | 5% |
| Other | 8% |
| First Fuel Ignited | |
| Dryer Contents | 45% |
| Lint | 24% |
| Wire Insulation | 9% |
| Other | 22% |
[1] NFPA: U.S. Home Product Report, Appliances & Equipment, November 2005.
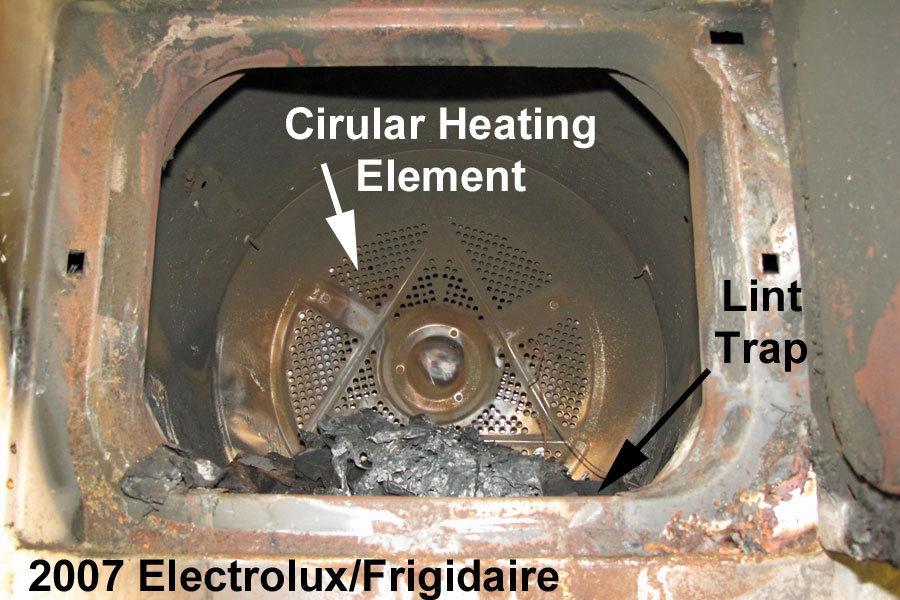
In 2014, there was a settlement of a class action lawsuit against Electrolux: United States District Court for Central District of California, Case No.: SACV12-1644-CAS(VBKx), Shawn Roberts et al. v. Electrolux Home Products, Inc. The plaintiffs claimed that the dryer design causes lint to accumulate in direct proximity to the circular heating element. They also claimed that the fire could spread from the lint to other combustibles in the dryer and spread to outside the dryer. The lawsuit included Electrolux-brand dryers (Frigidaire, etc.) manufactured between January 1, 2002, and December 31, 2011. The settlement provides for a free cleaning service, a rebate or online voucher code worth up to $350 off the purchase of a new Electrolux-brand appliance, and up to $1,300 for out-of-pocket expenses due to a fire.
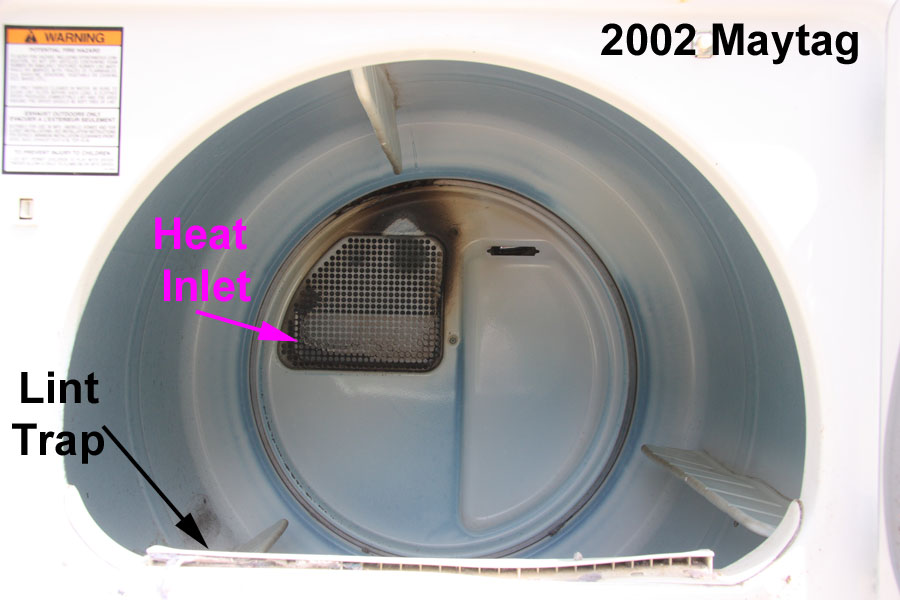
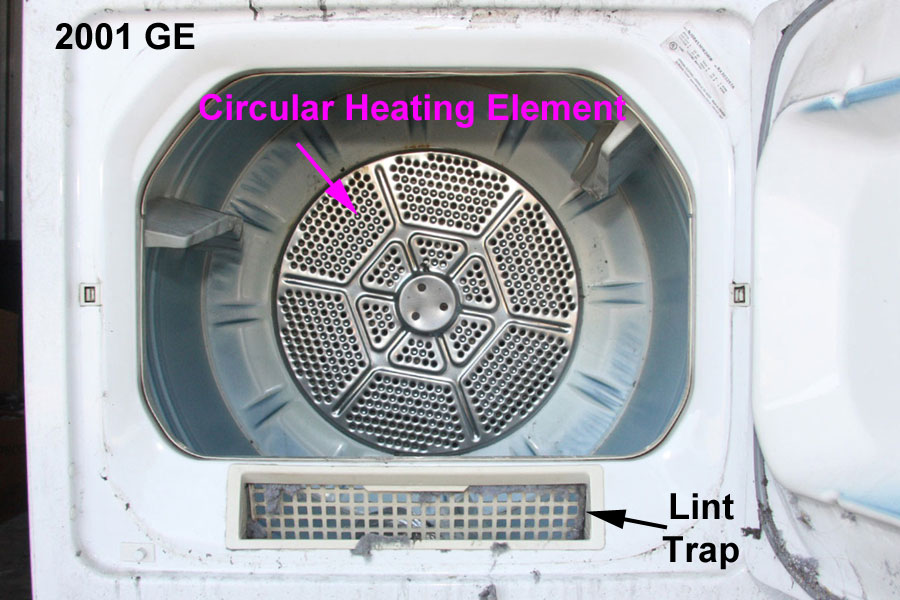
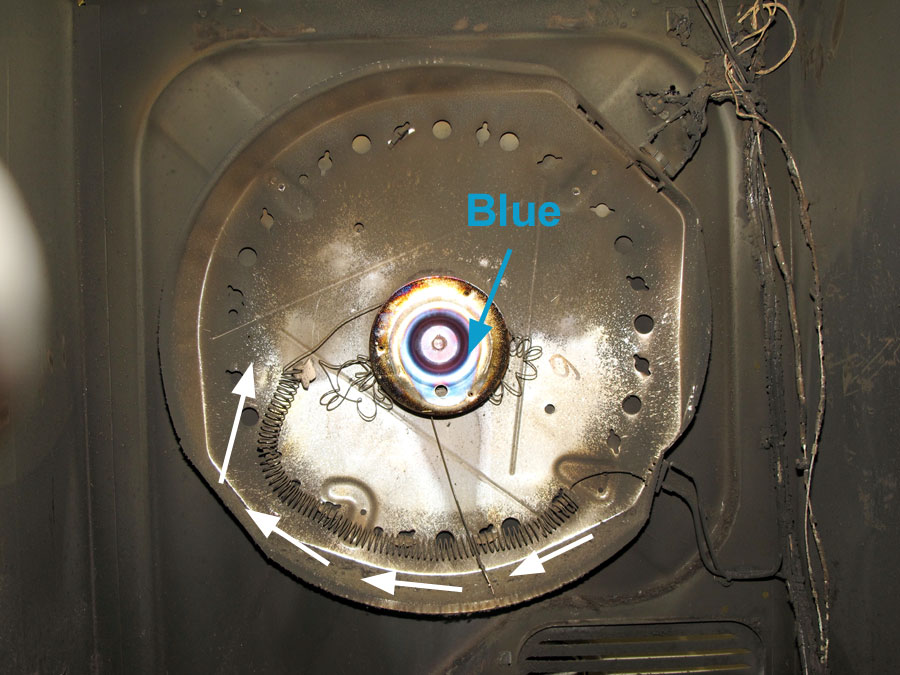
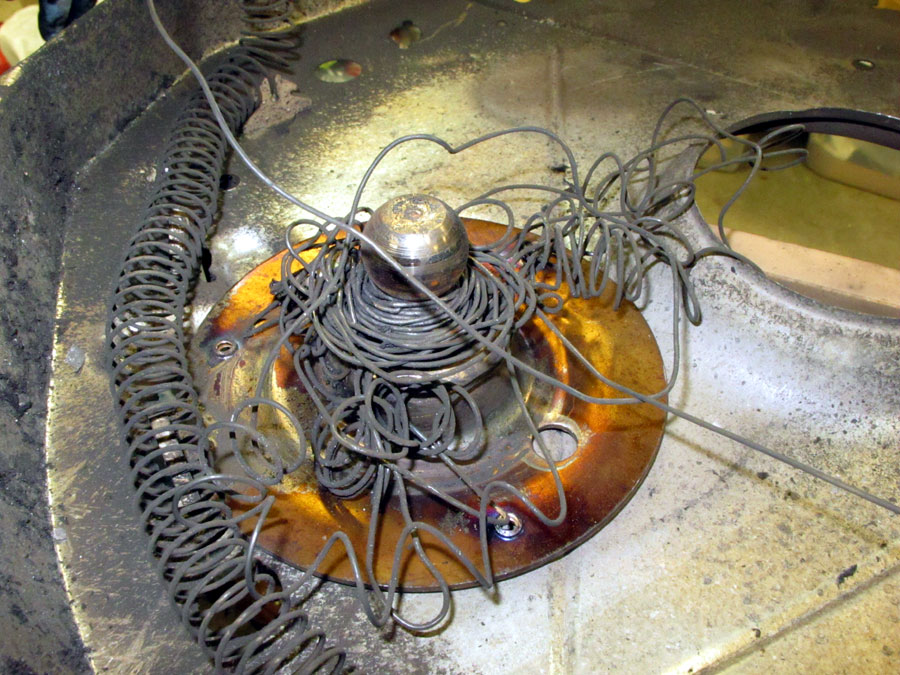
This case started out as three separate class action lawsuits that were filed against Electrolux in 2012. Each case had their own attorneys and expert witnesses. In 2013, the three cases were merged into a single class action lawsuit. From what I have read, the alleged design defects include both the lint trap and the circular heating element. To best of knowledge, only Electrolux and GE dyers used a circular heating element with a ball hitch drum. See the drum of the Electrolux/Frigidaire dryer in the case histories below.
UL Standard 2158 for Electric Clothes Dryers is a harmonized standard with the Canadian Standards Association, CSA C22.2 No. 112. This standard required that electric clothes dryers manufactured after March 29, 2013, pass four aggressive fire containment tests. This is as close as you're going to get to the dryer manufacturers admitting that they cannot design electric clothes dryer to prevent fires; therefore, they have to contain them.
Statistically 4% or 1 out of 25 structural fires involves a clothes dryer. Hence, fire investigators and forensic engineers doing subrogation work for insurance companies need to recognize dryer fires. Generally, the dryer is examined in the laboratory by a forensic engineer. Most of the time, the electrical engineer is looking for some fault in dyer that cause the dryer to overheat: stuck thermostat, thermistor failure, moisture sensor failure, timer failure, arcing on the motor winding, wire chafing, etc. Usually, they do find anything wrong with the dryer components, or they are too damaged to test. The engineer rules the fire undetermined because he has nothing to support subrogation. This is because the evidence (lint) was consumed in the fire. After a dryer fire, you are not going to find lint in close proximity to the heating element; it was the first material ignited and consumed by the fire. However, you do not have to have a component failure to cause a dryer fire as manifested by the 2014 Electrolux Class Action Dryer Settlement and by the new (2013) fire containment requirements in UL Standard 2158.
Self-heating and spontaneous combustion are more likely to occur in organic materials such as vegetable oil and animal fats. These oils contain polyunsaturated fatty acids. When fatty acids react with oxygen, heat is produced. The substrate is usually a cloth material that contains cotton. If the heat is unable to escape, then thermal runaway occurs. The fire starts off as a self-sustained smoldering fire, and as the temperature and/or oxygen increase, the cloth material ignites and becomes a fire with visible flames. Although self-heating can occur with lubricating and motor oils, they are harder to spontaneously ignite than cooking oils.
A rise in the temperature of the cloth material and a pile of clothes both contribute to self-heating, thermal runaway, smolder, and ignition with flames. To decrease the likelihood of a spontaneous combustion dryer fire, every dryer cycle ends with a cool down period in which the drum is turning but the heat is off. Spontaneous combustion can occur inside the dryer, or it can outside the dryer with or without the clothes being folded and stacked. Folded and stacked clothes should never be left on top of a dryer as other clothes are being dried.
As a forensics electrical engineer, the majority of the spontaneous combustion dryer fires that I have investigated occurred in commercial locations where food was served. I have also investigated spontaneous combustion fires for insurance companies where a clothes dryer was not involved. For example, a home under construction where rags that were used to stain wood, were piled on top of each other
Reference:
1. NFPA 921, Guide for Fire & Explosion Investigations, 2014 Edition, Section 5.7.4.1.
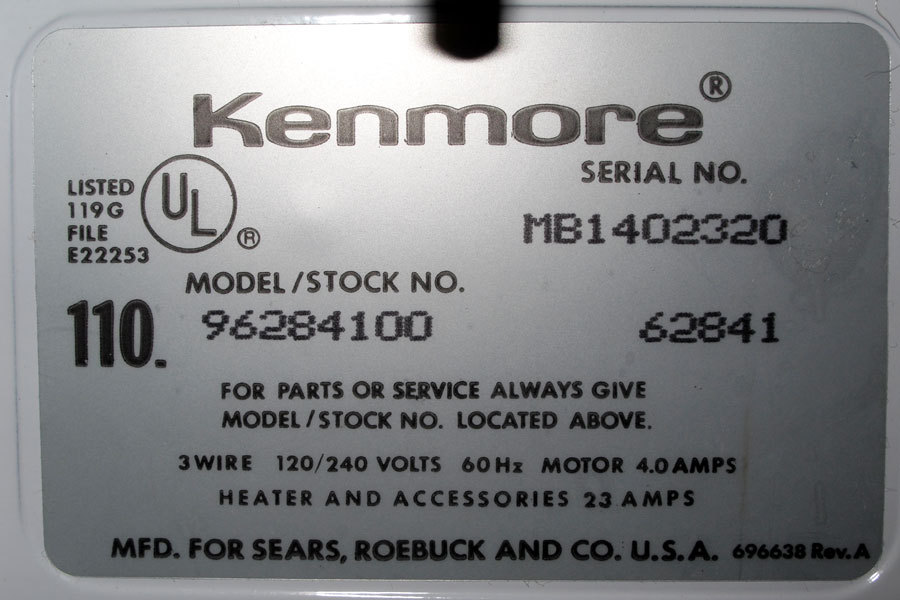
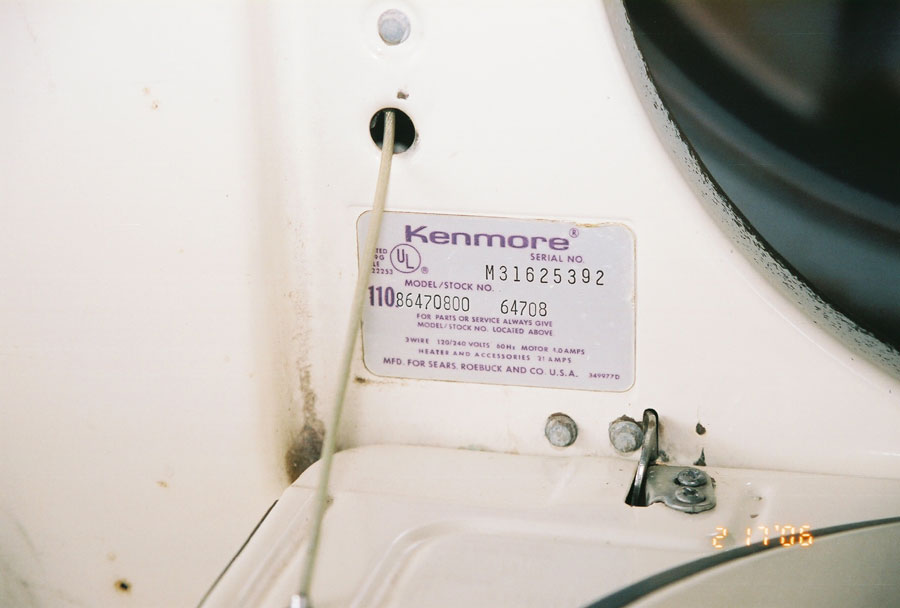
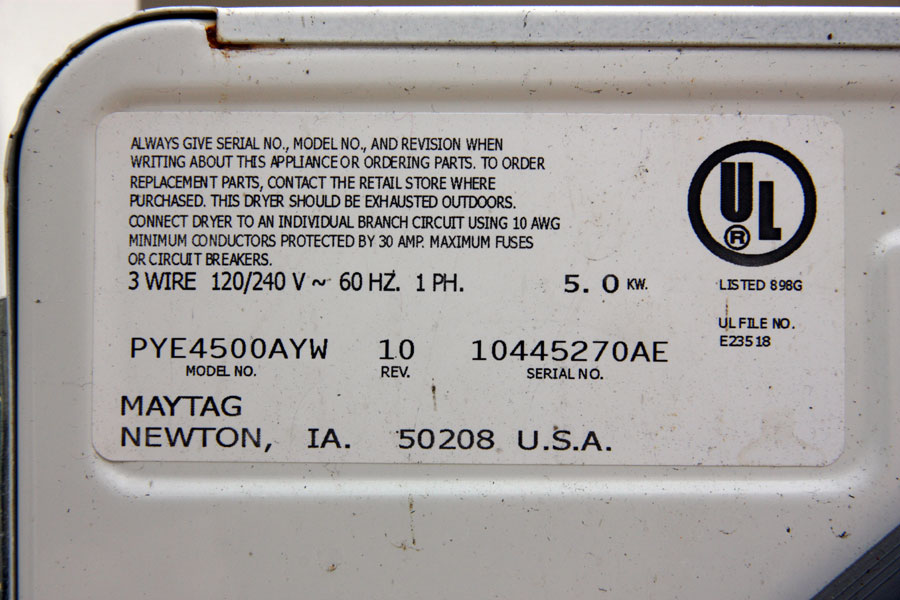
The first question the insurance company is going to ask the forensics engineer is, how old is the dryer? If the dryer manufacturer is put on notice, they will want to know the model number, serial number, date of manufacture, where purchased and date of purchase.
Major Appliance Manufacturer's Brands and Date CodesThe manufacturer's paper or metal foil tag may be unreadable. Most manufactures have hidden date codes stamped into the metal.
However, the get to some of the hidden date codes, the dryer may have to be disassembled to the point that afterwards the manufacturer may claim spoliation of evidence.
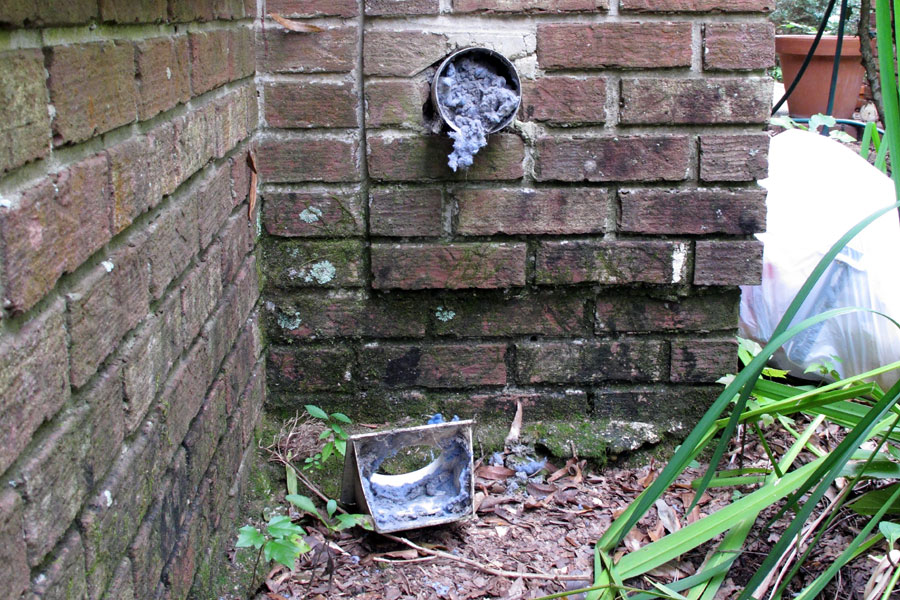
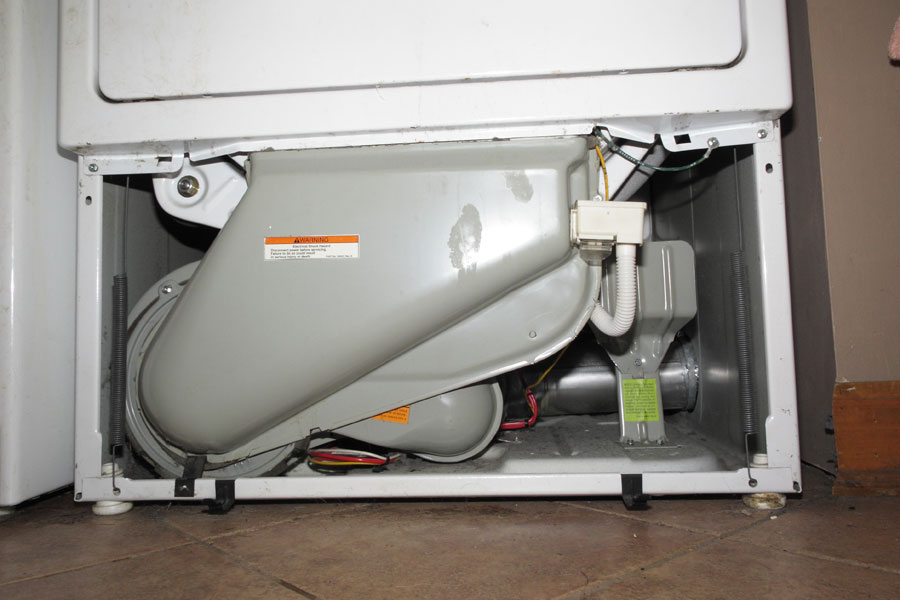
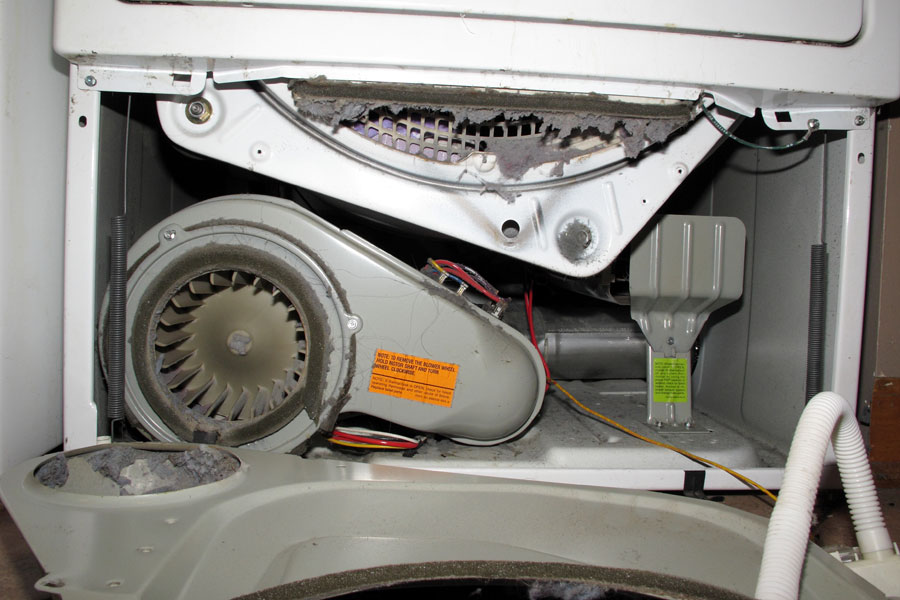
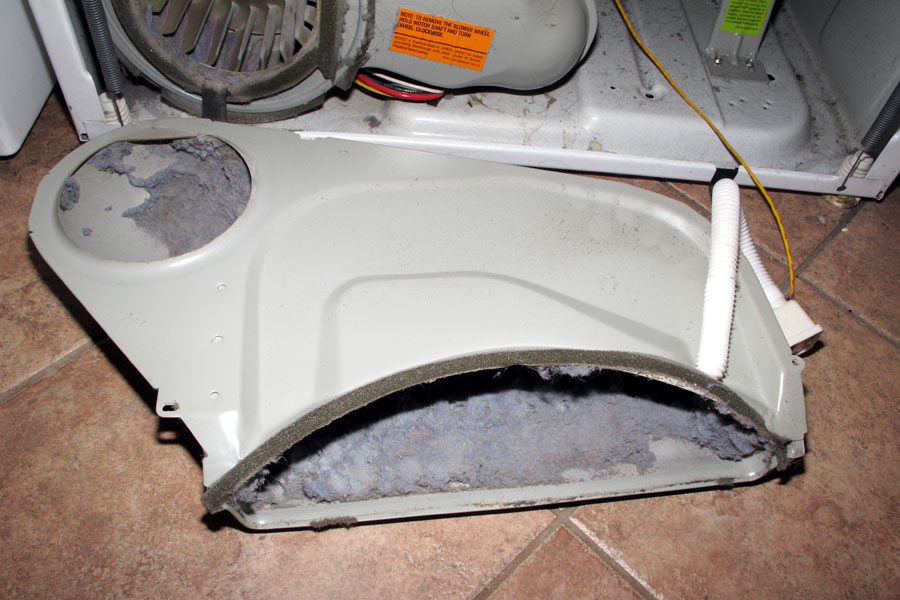
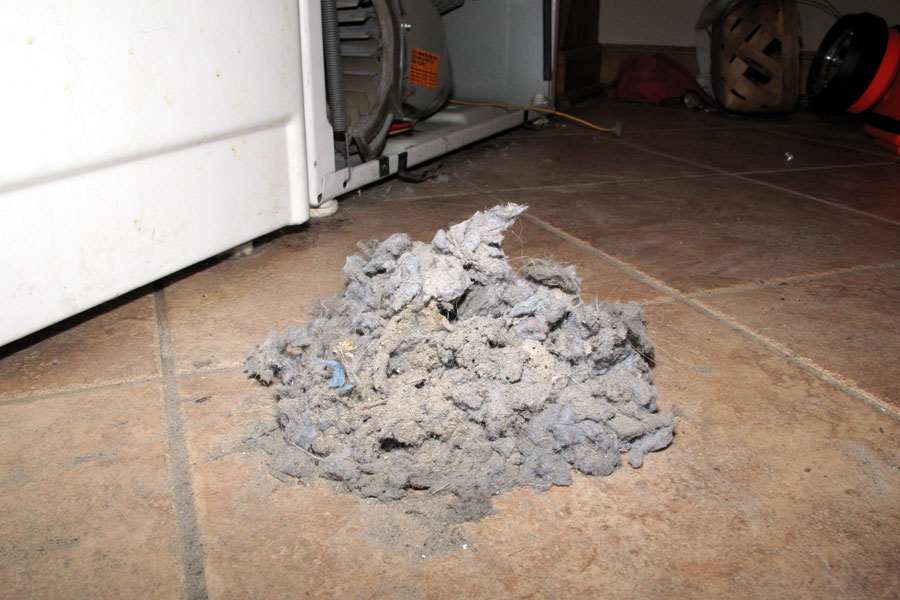
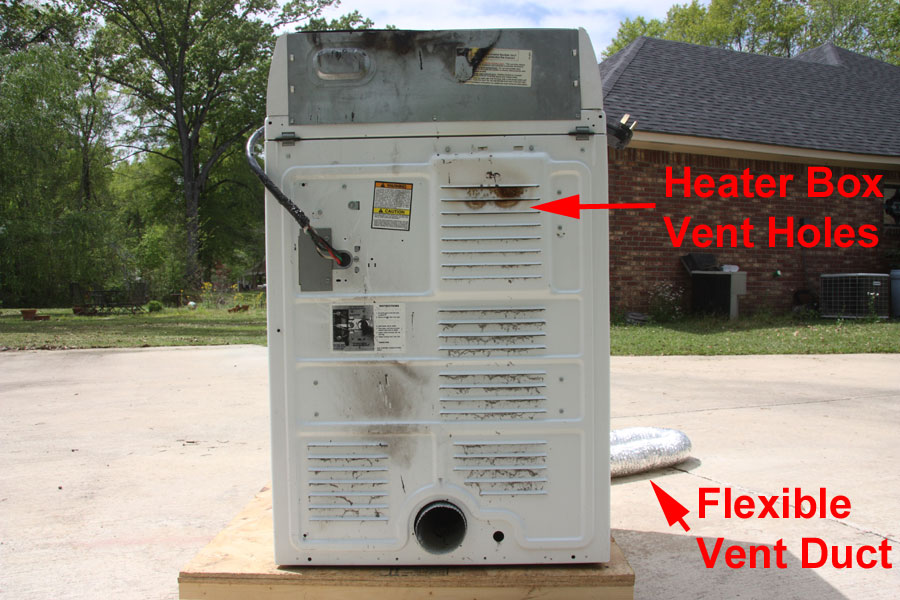
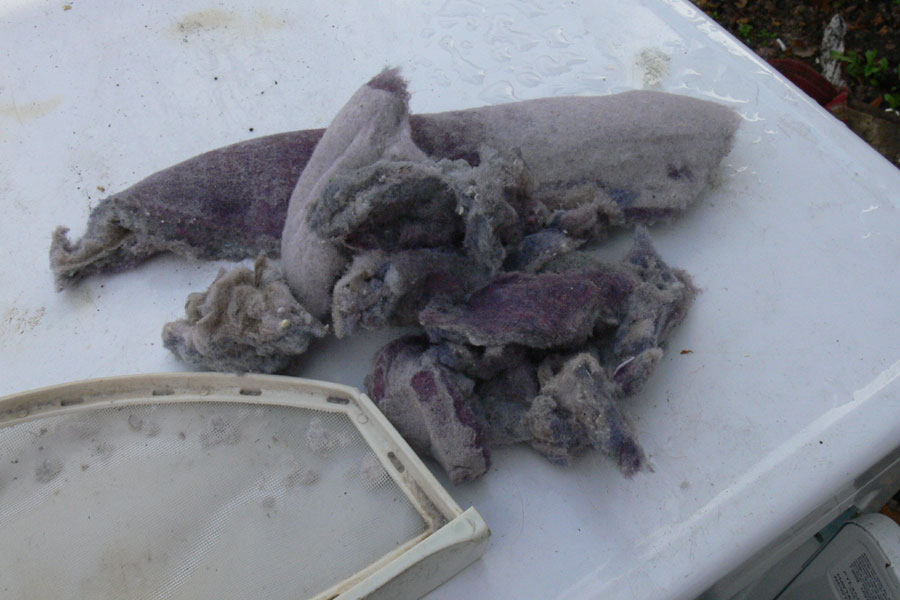
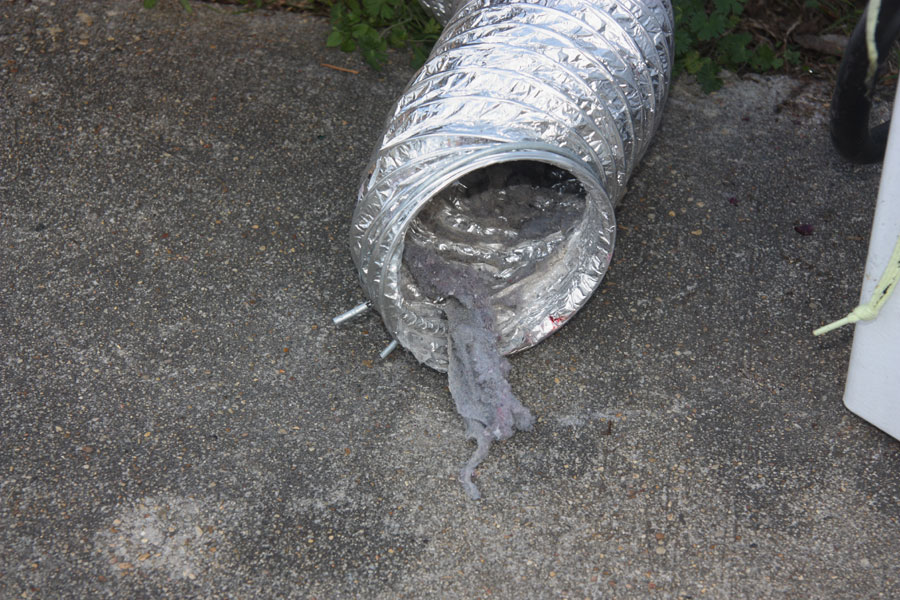
The predominant cause of dryer fires is lint build-up in the dryer or the exhaust duct. Lint build-up restricts air flow, which results in the clothes taking longer to dry. Lint build-up often occurs because the flexible exhaust duct gets pinched or crushed. Flexible dryer ducts are known to collapse. In addition to prohibiting the use of plastic and vinyl flexible ducts that support combustion, dryer manufactures, do not allow using metal foil ducts. Except for the fact that they will not burn, metal foil ducts have the same problems as plastic and vinyl ducts; air flow can be restricted, and they can collapse. Sears, Lowe's, Home Depot, and Best Buy have had class action lawsuits against them for failing to follow the manufacturer's instructions and installing foil metal exhaust ducts. Although a foil metal duct is a flexible metal duct, it is not "the" flexible metal duct that manufacturers refer to in their installation instructions. This is a heavy metal flexible duct that cannot collapse. Again, dryer manufacturers do not allow the use of foil metal ducts. See Manufacturer's instructions for installing dryers below:
Whirlpool Dryer Installation Instructions
GE Dryer Installation Instructions
Electrolux Dryer Installation Instructions
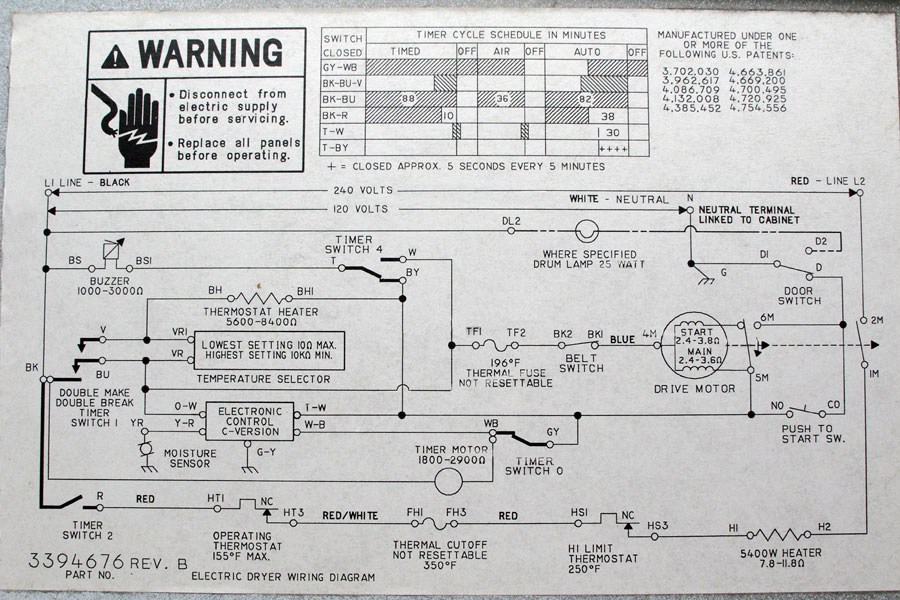
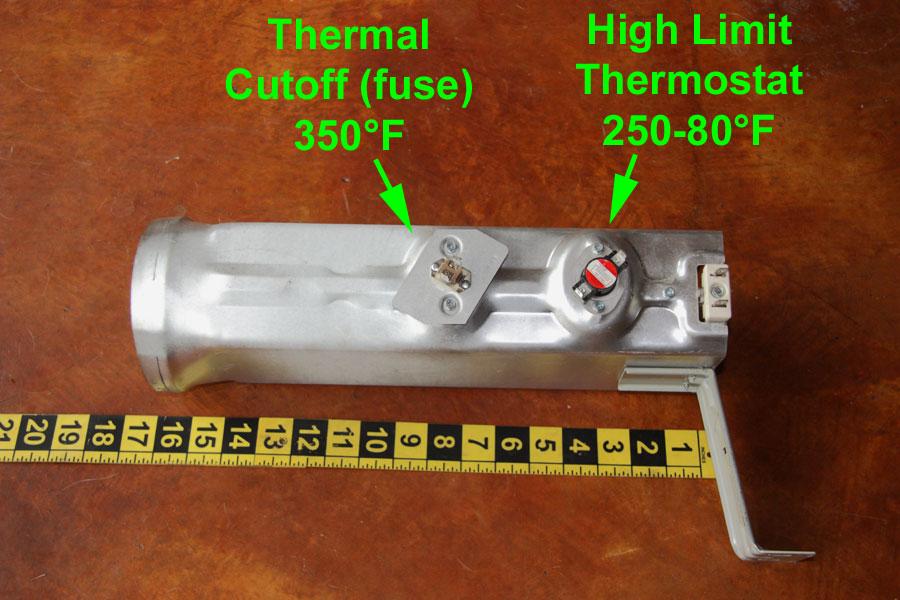
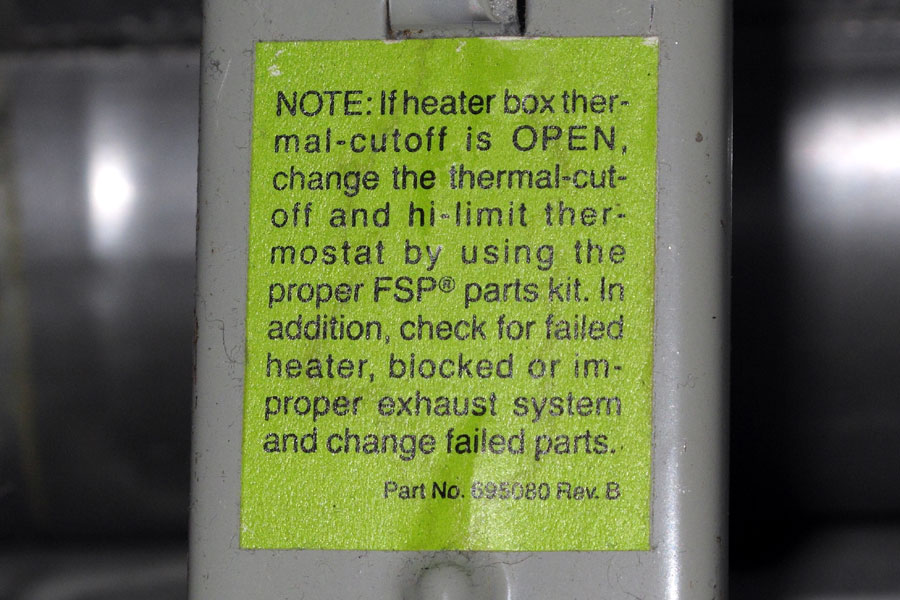
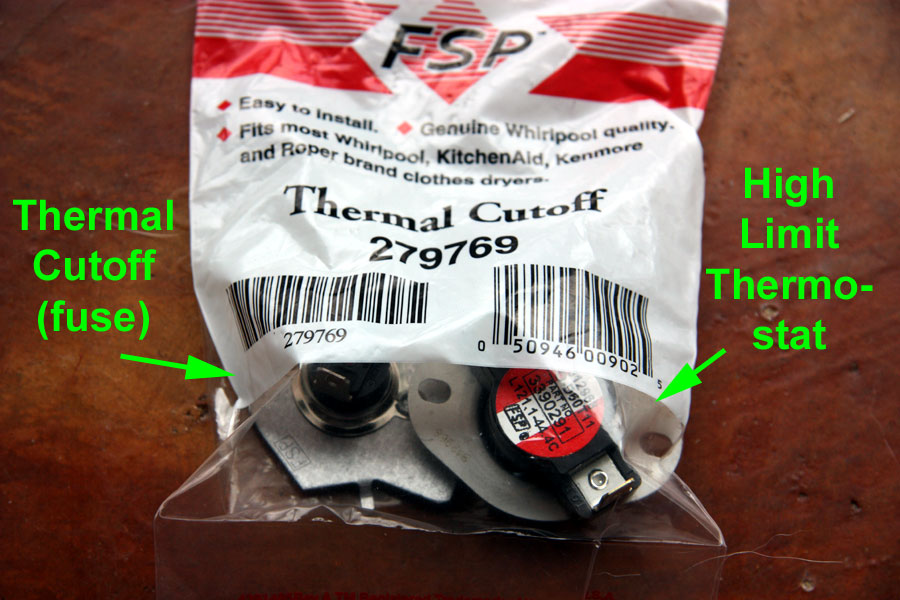
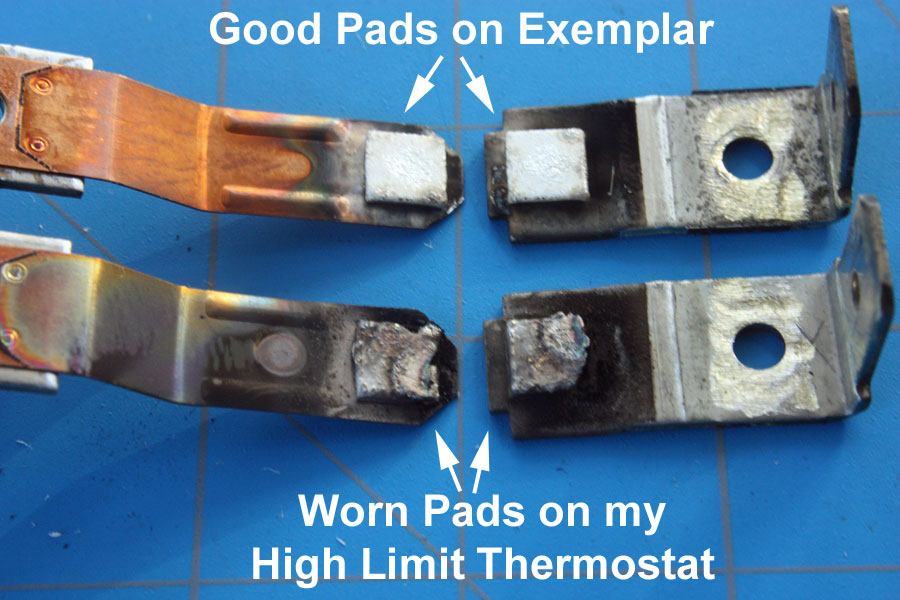
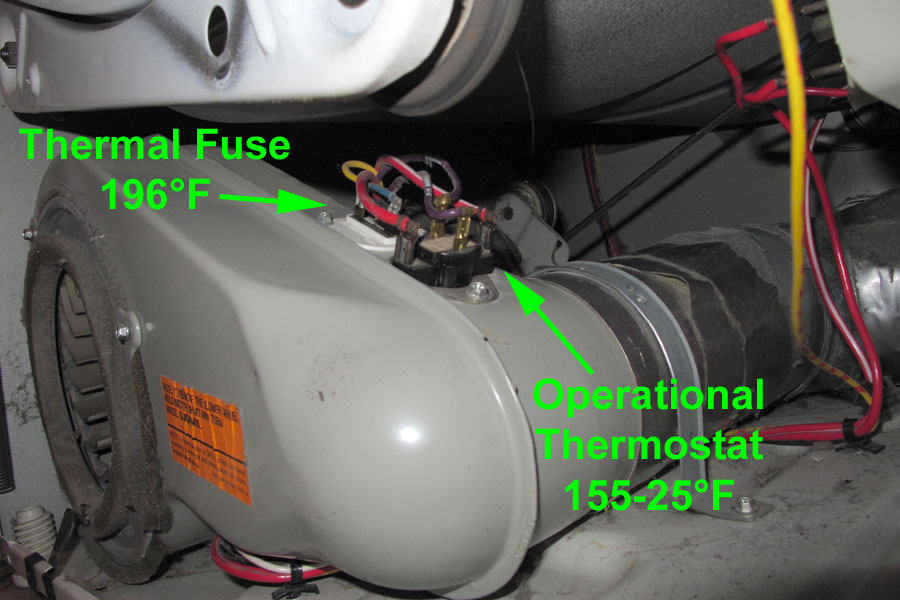
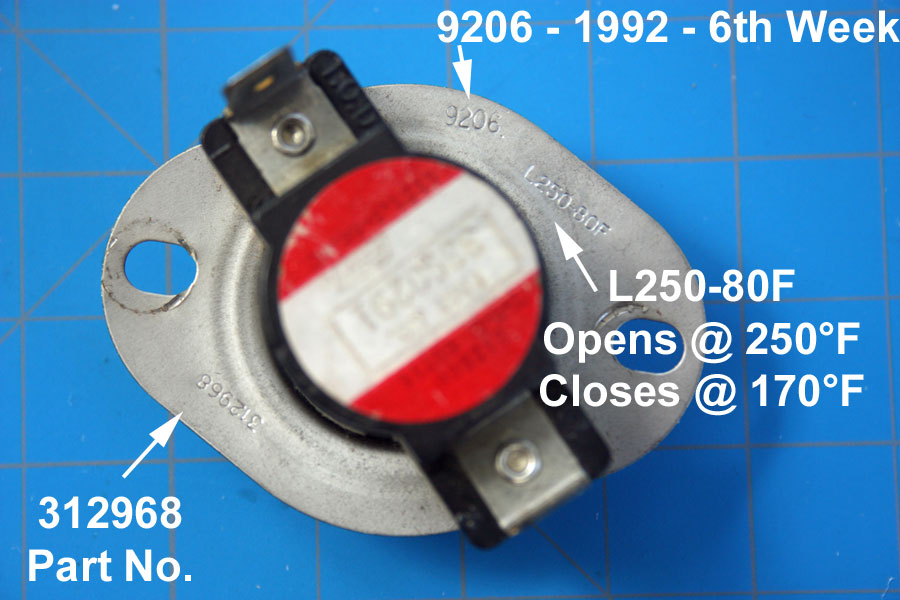
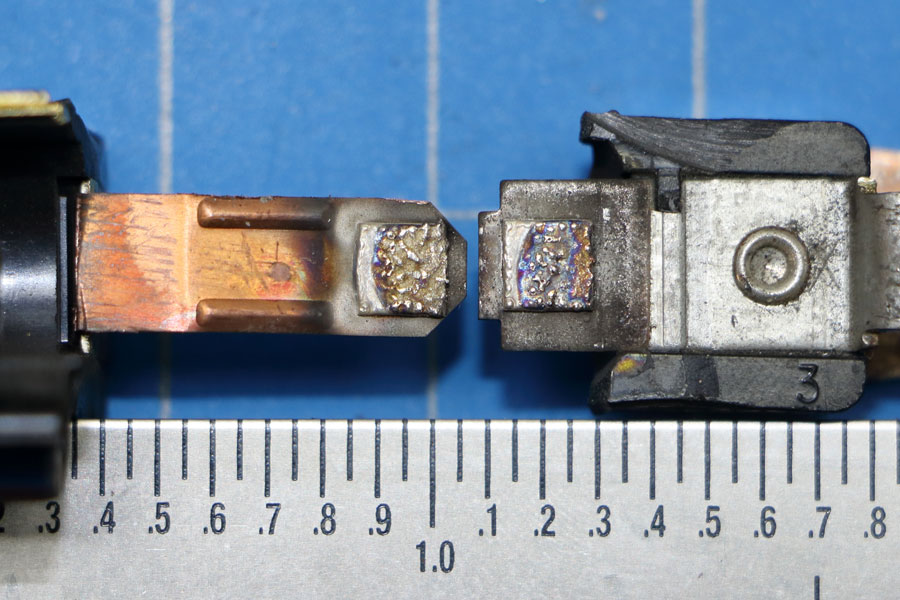
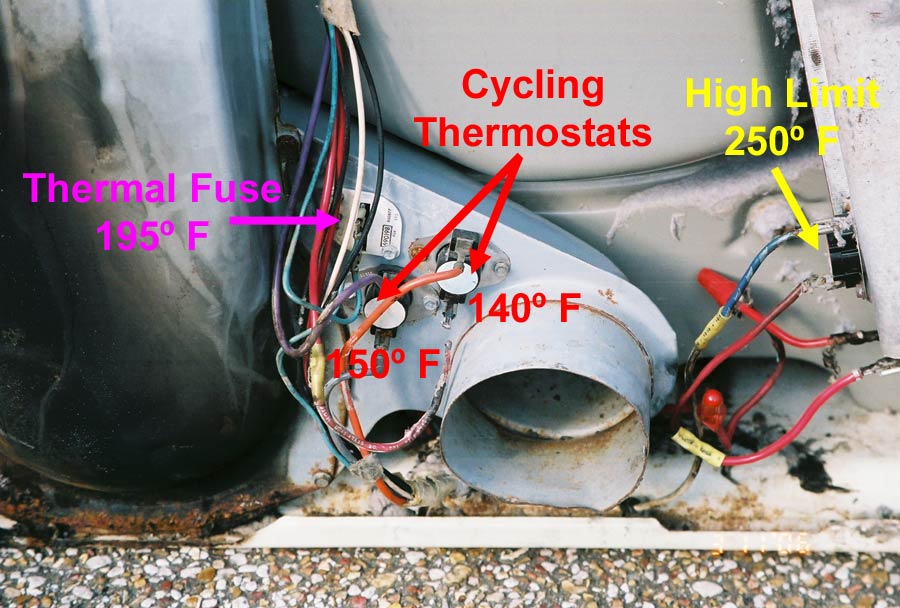
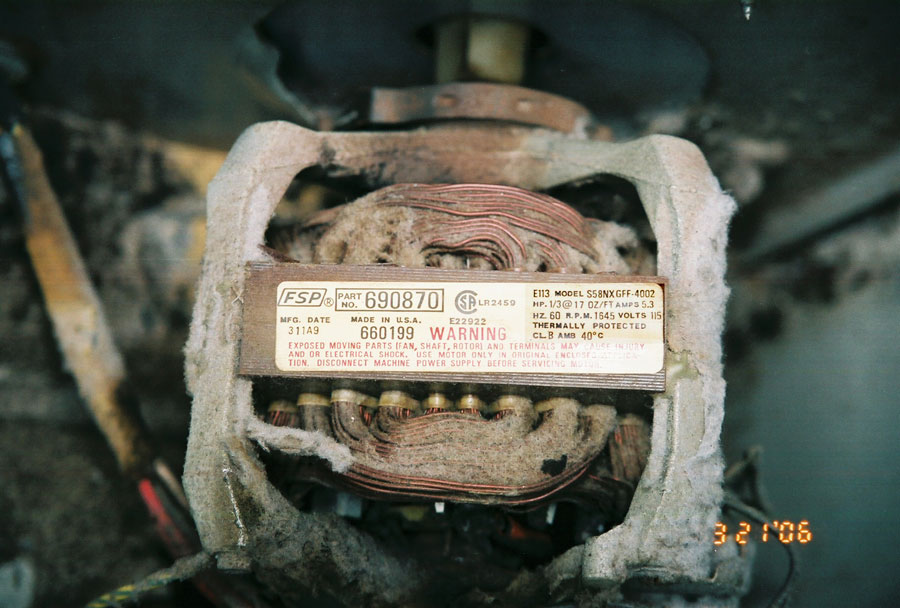
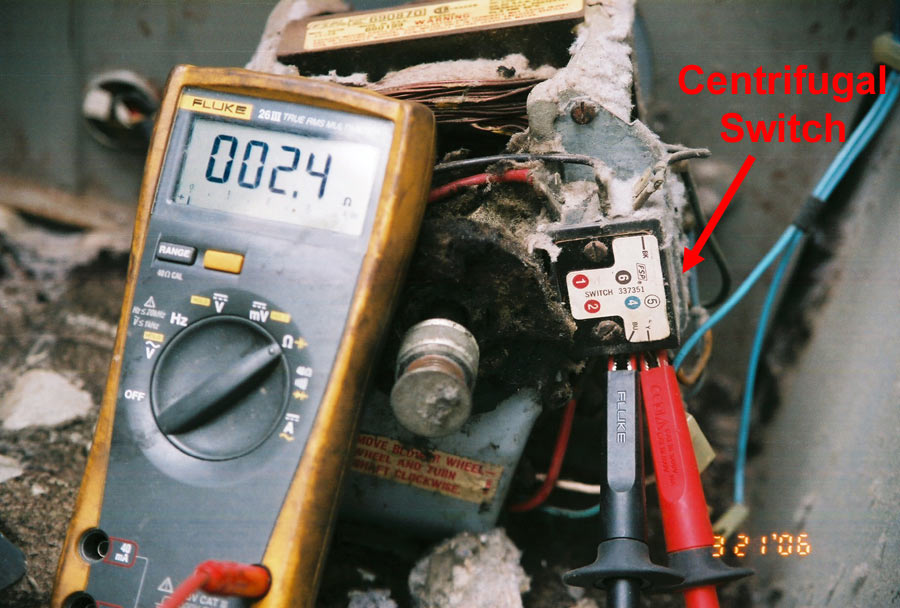
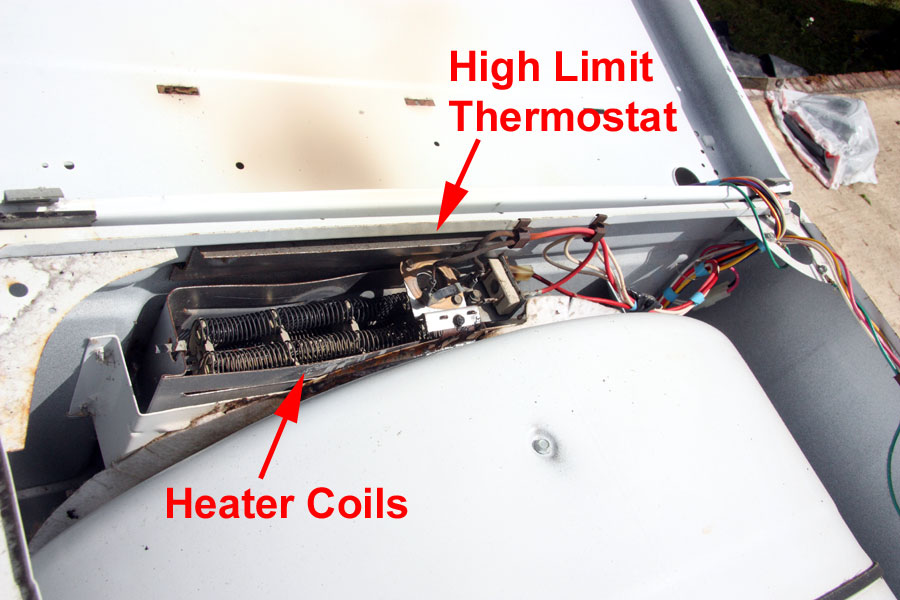
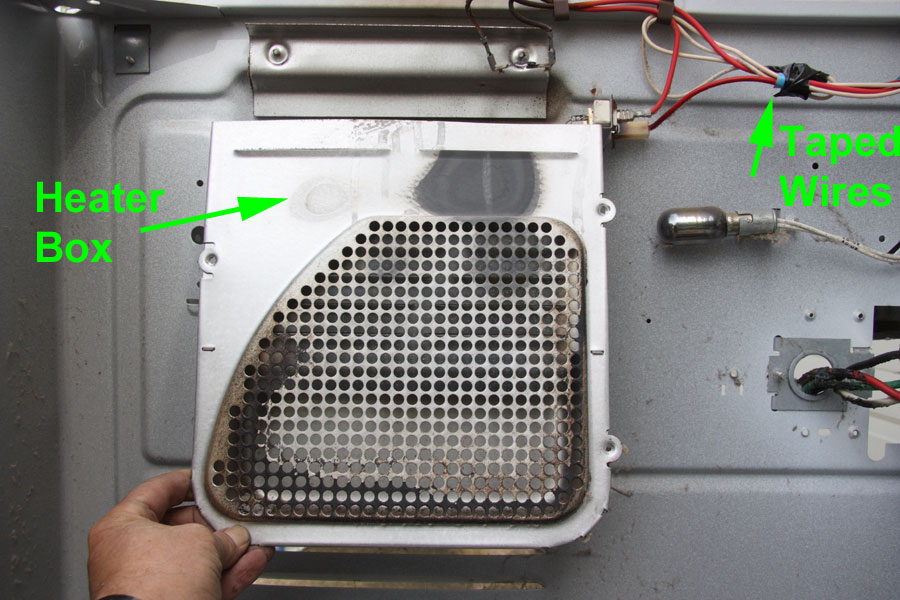
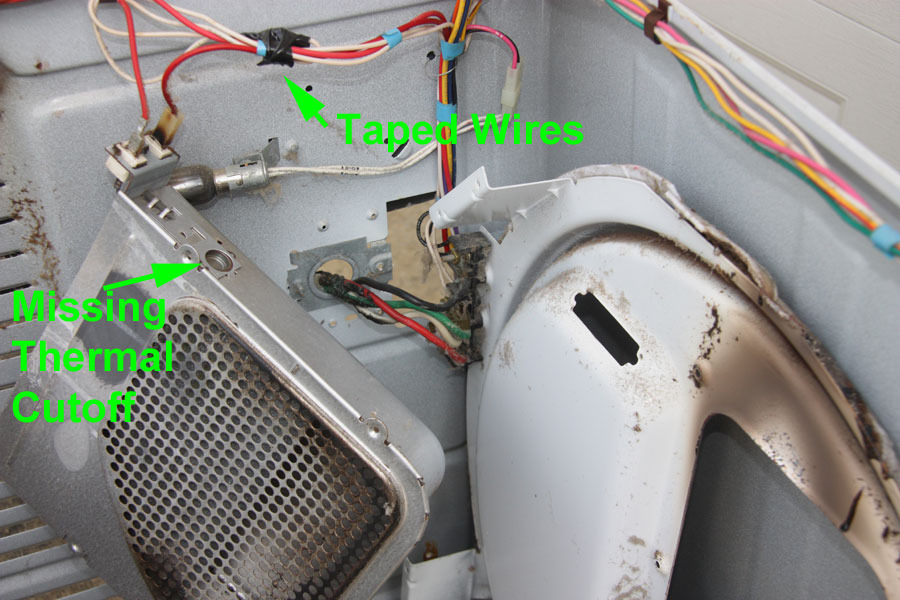
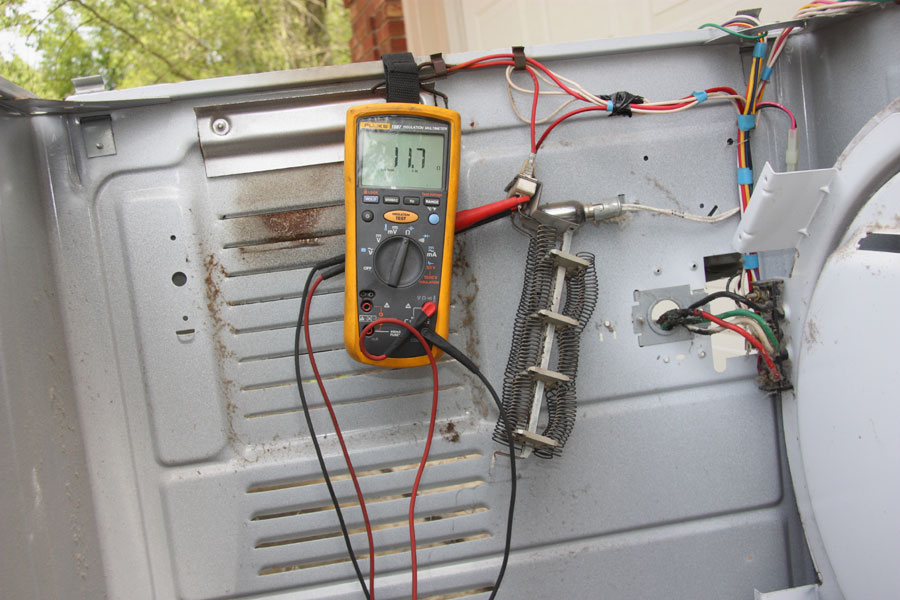
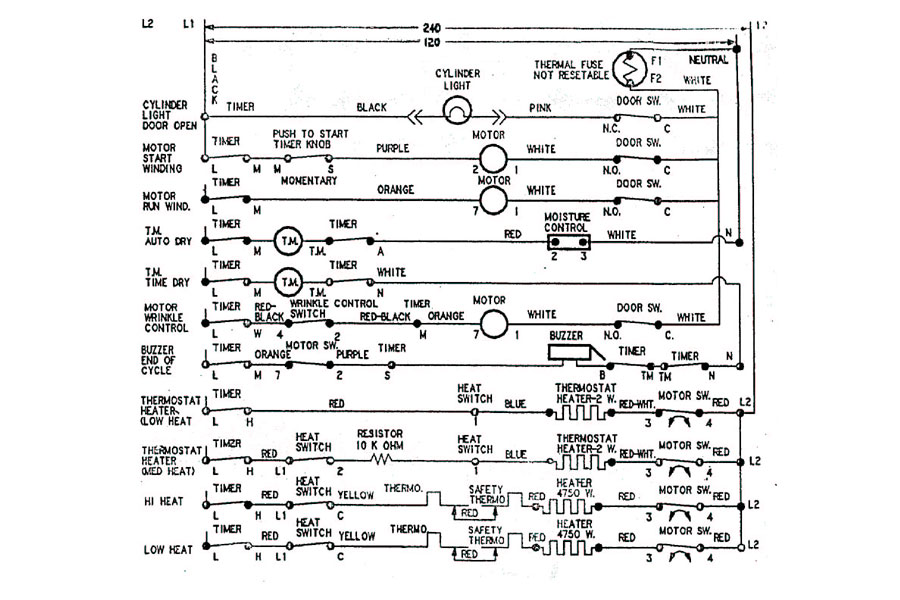
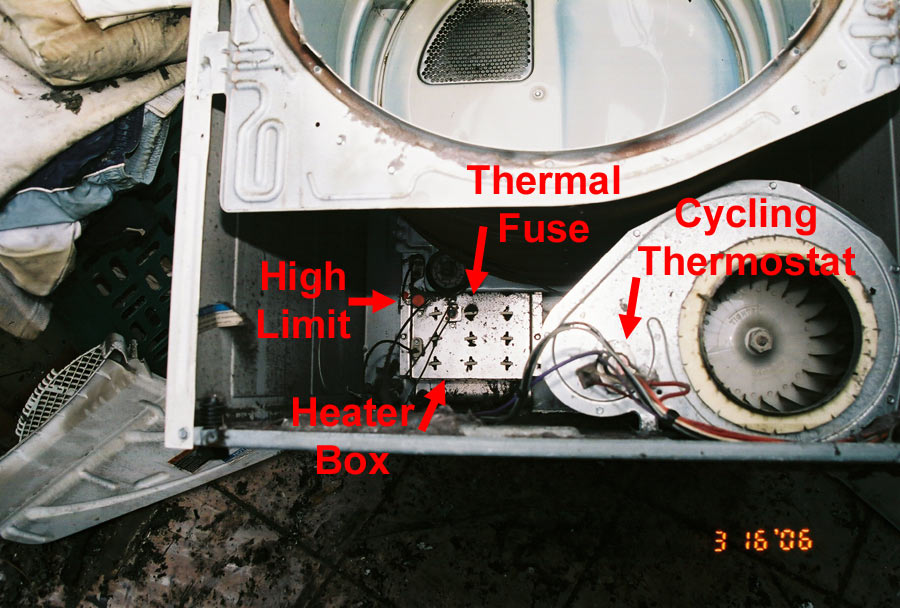
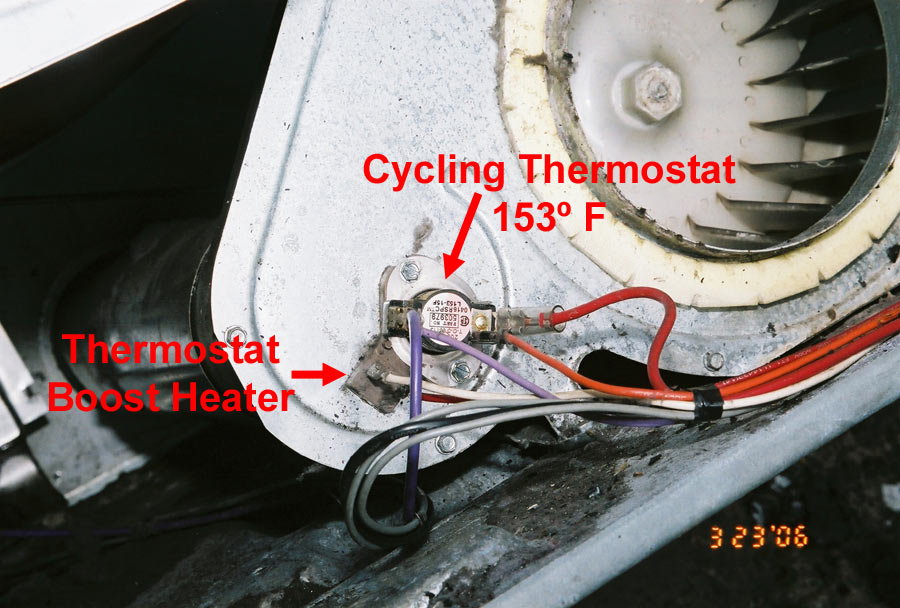
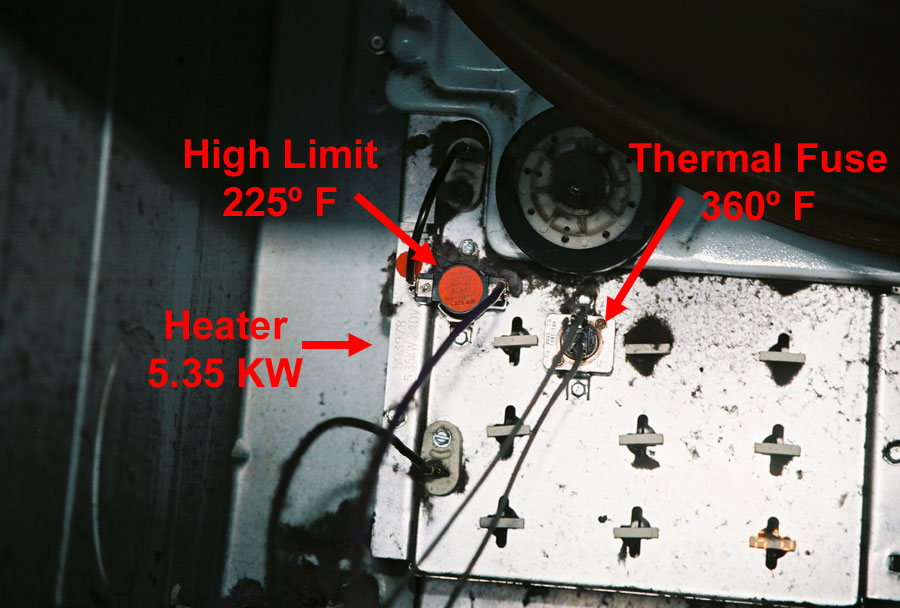
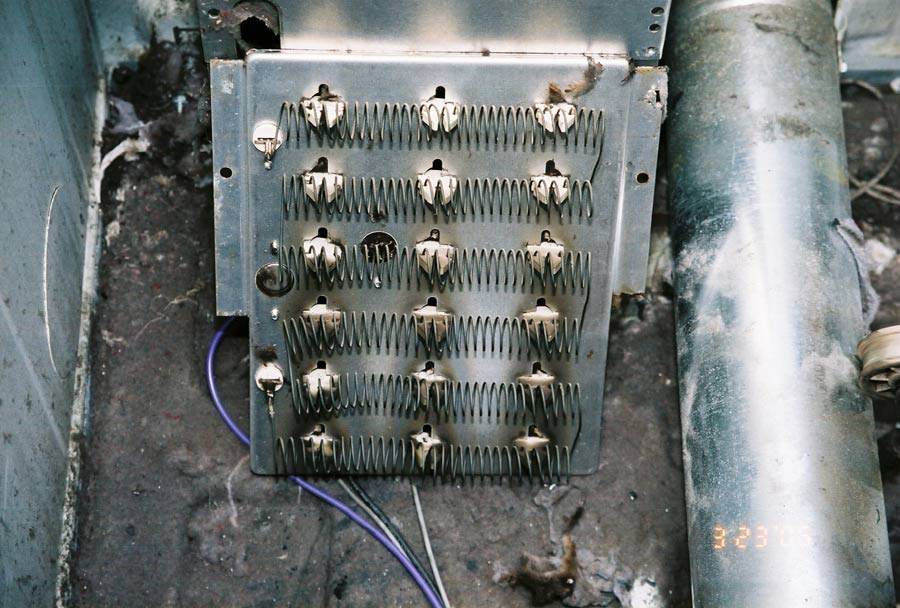
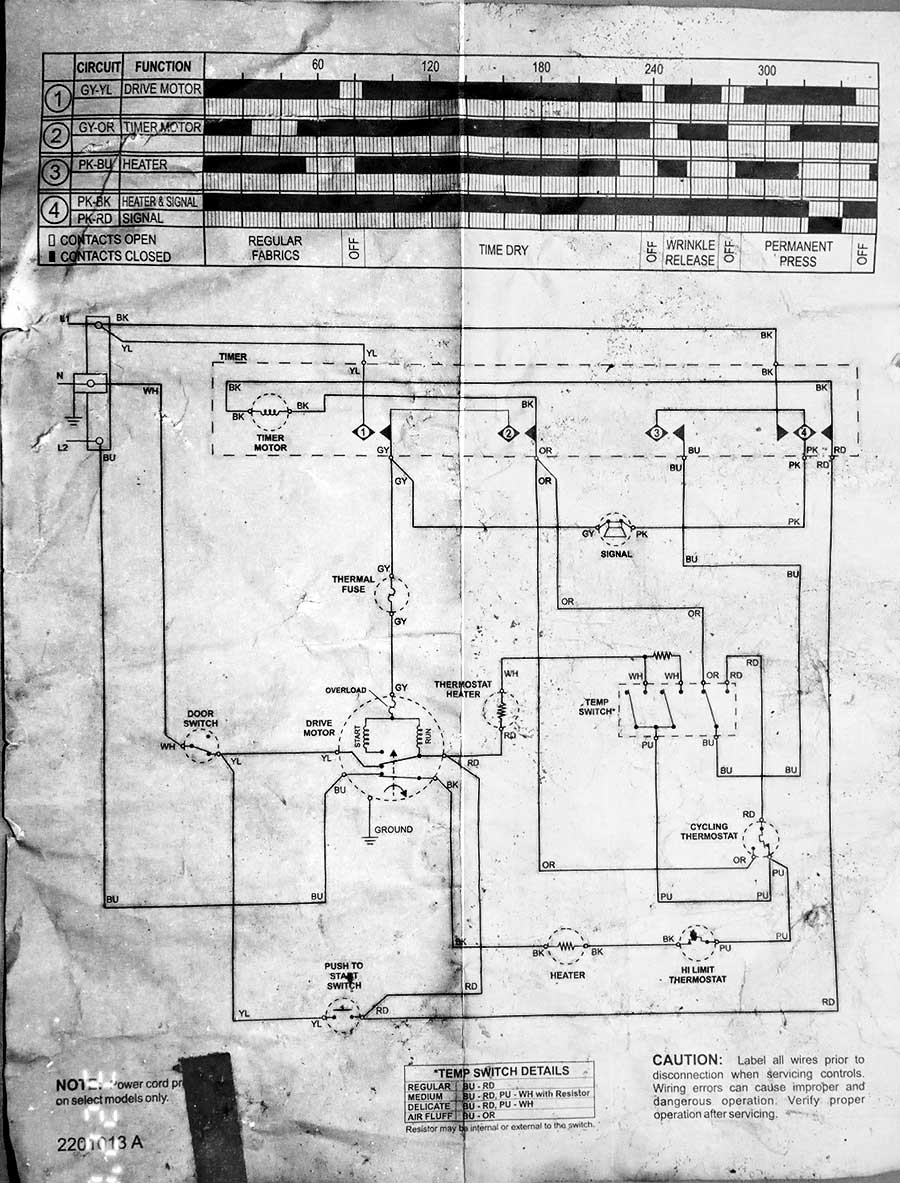
Most dryers have at least an operational thermostat, a high limit thermostat, and a thermal fuse. The operational thermostat measures the temperature of the air flowing through the dryer. That is, the air that is drying the clothes. Depending on its location, the operational thermostat is usually between 120-160°F. The high limit thermostat and thermal fuse are usually located on the heater box. The value of the high limit thermostat depends on the design of the heater box, but 250°F is a typical value. The value of the thermal fuse is usually 100°F higher than the thermal fuse, but again its value depends on its location. The thermal fuse is a one-shot device; when it melts, it has to be replaced.
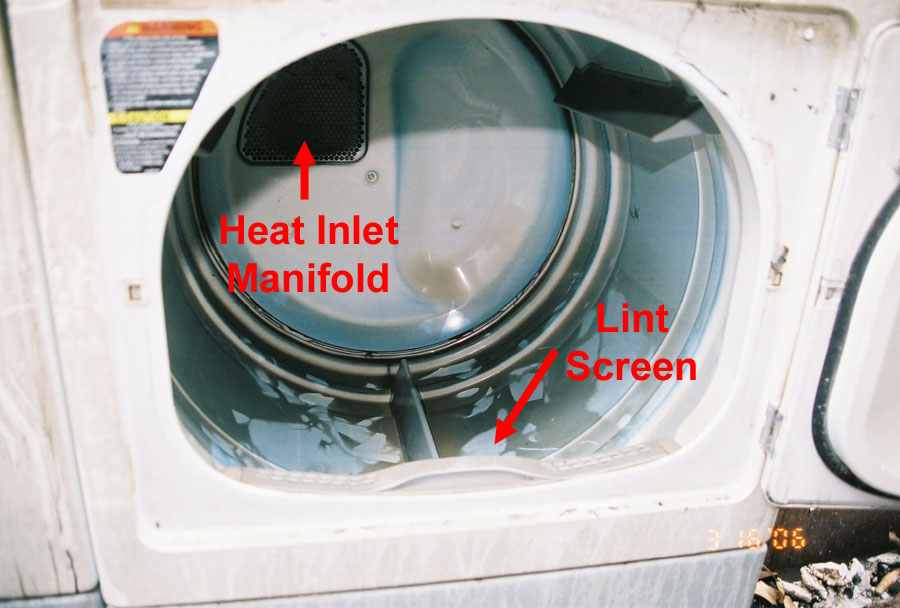
When the dryer vent is pinched or clogged with lint, air does not circulate through the dryer. Hence, the operational thermostat is not measuring the temperature of the air flowing across it because there is no air flowing across it or the amount of air has been severely limited. Air circulation is also what cools the heater coils in the heater box. Without air flowing, the heat in the heater box will continue to rise until it activates (opens) the high limit thermostat. Now the dryer is cycling according to the temperature of the heater box; the operational thermostat is not working because there is no air flowing across it. Usually, high limit thermostats are not designed for the millions of openings and closings that operational thermostat sees; it is a safety device. If the high limit thermostat sticks or the contacts become welded together, the temperature continues to increase until the thermal fuse melts. At this point, the dryer stops heating. The thermal fuse is a last resort device. No one wants to go in the interior of their dryer and replace a thermal fuse because they forgot to clean the lint filter
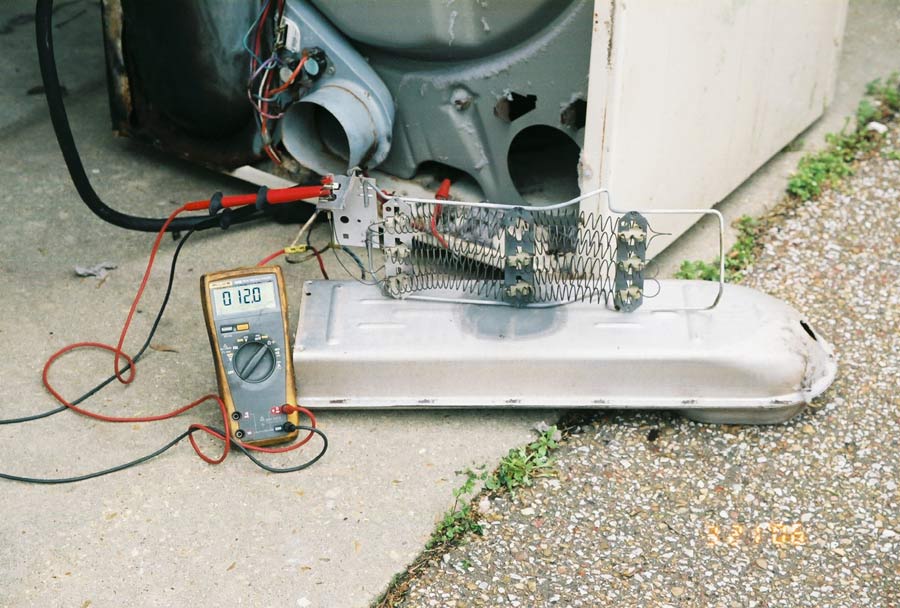
When the thermal fuse melts, it almost always means that some other device in the dryer has failed. For example, when the thermal fuse in my dryer failed, I found out that I could not just order a thermal fuse. I had to order at kit that contained both the high limit thermostat and the thermal fuse. I tested the old high limit thermostat, and the contacts were electrical welded together. I have rigid metal ducts. My problem was not with the rigid metal ducts, but the PVC pipe that when into the wall and to the outside. I had not cleaned my exhaust system in 17 years. Most manufacturers state that the entire lint duct system should be cleaned at least every 18 months.
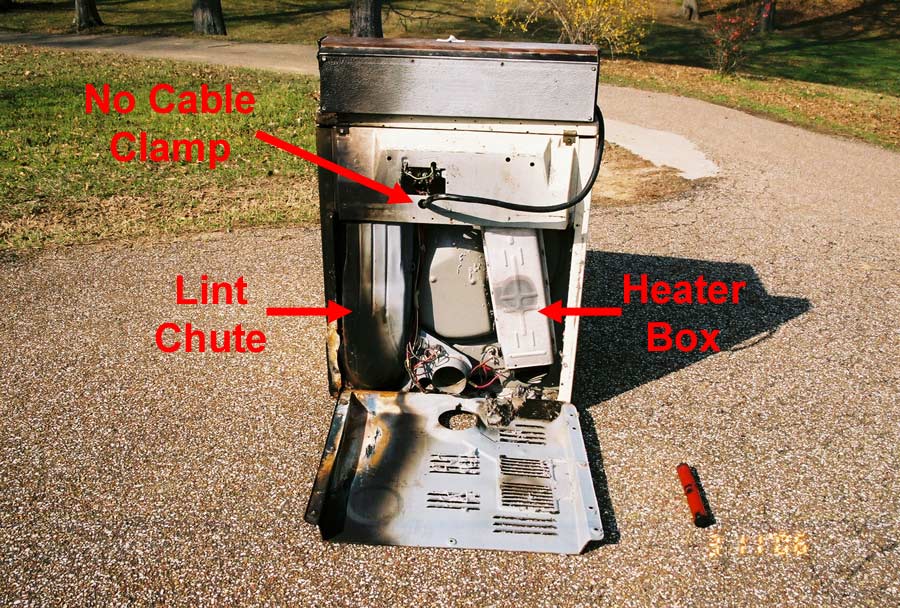
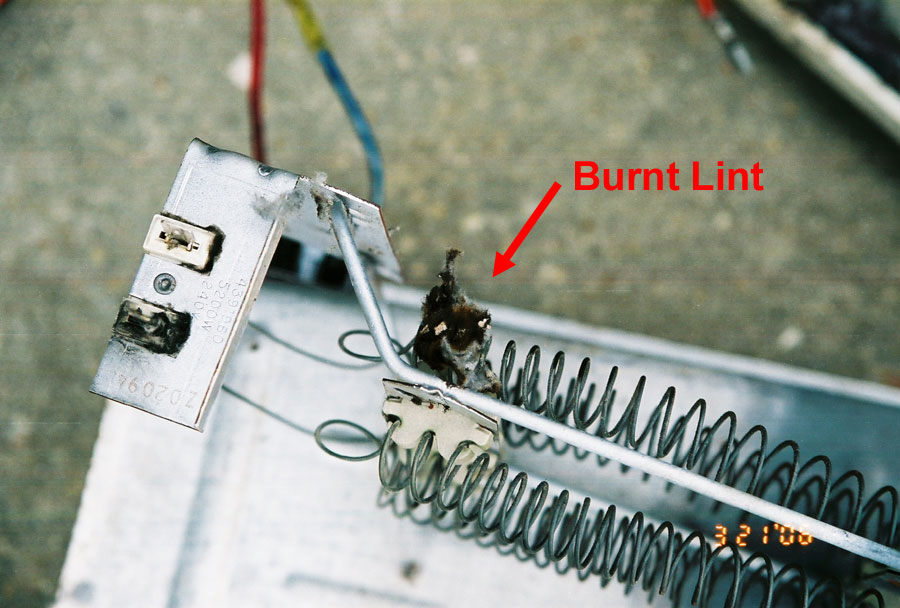
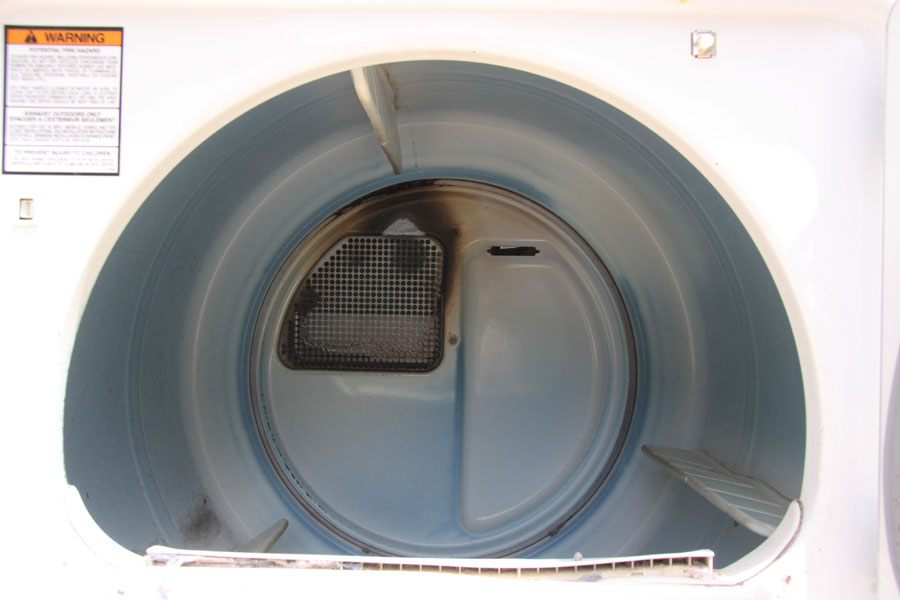
I have investigated a number of dryer fire caused by someone bypassing the thermal fuse. However, fires can occur even before the thermal fuse blows. When air is not properly circulating, the lint does not have anywhere to go but into the dryer. This can result in lint getting on the drum motor and into the heater box, which can ignite the lint.
The autoignition temperature of lint is 511°F (266°C).
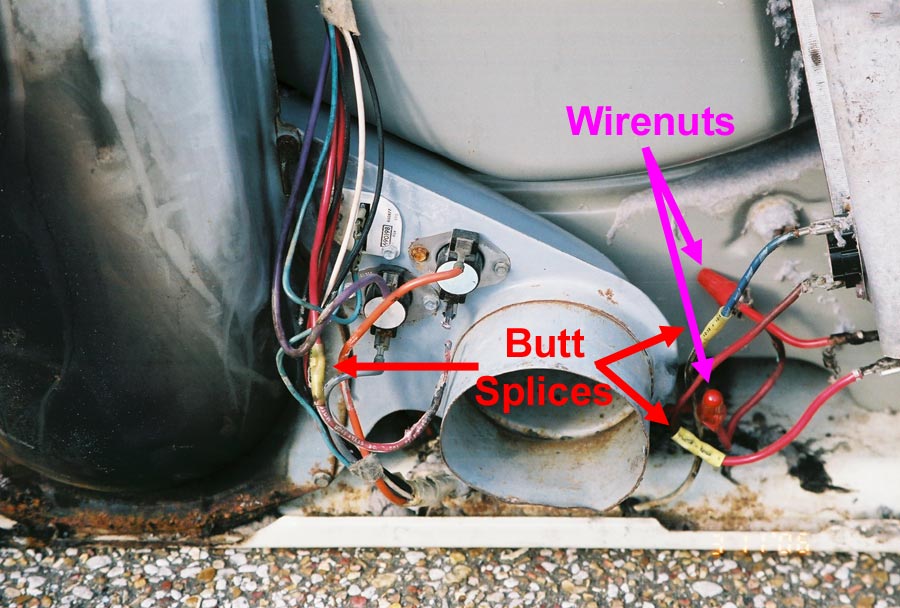
Another problem with dryer is that they vibrate. This is especially true when the load in them become unbalanced. Dryer vibrations can cause electrical screw connections to become loose and wires to chaff against sharp objects.
After a dryer fire, the manufacturer's name is often not visible. A good forensics engineer can look at the dryer's drum and determine which company manufactured the dryer. However, the design of dryer drums do change. The good news is the number of major appliance manufactures in the U.S. has been reduced from four to two. In 2006 Whirlpool purchasing Maytag, and in 2014 Electrolux purchasing GE's Appliance Division. See the following link for a list of major appliance manufacturers and their brands:
Major Appliance Manufacturers and their Brands
Most manufacturers also stamp "hidden" date codes into the metal of the dryer. A good expert witness knows where the hidden date codes are and how to read them.

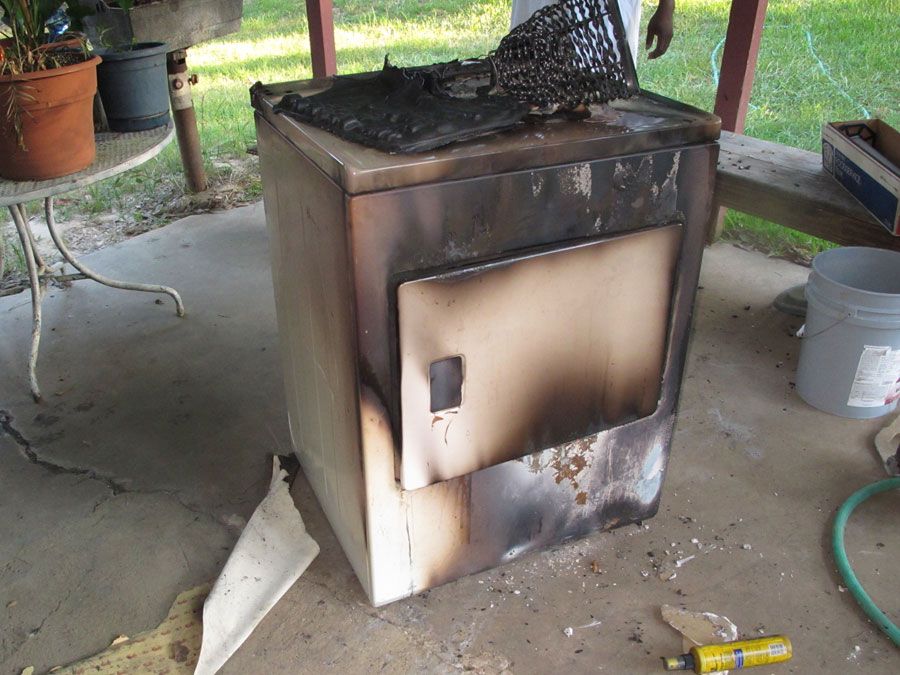
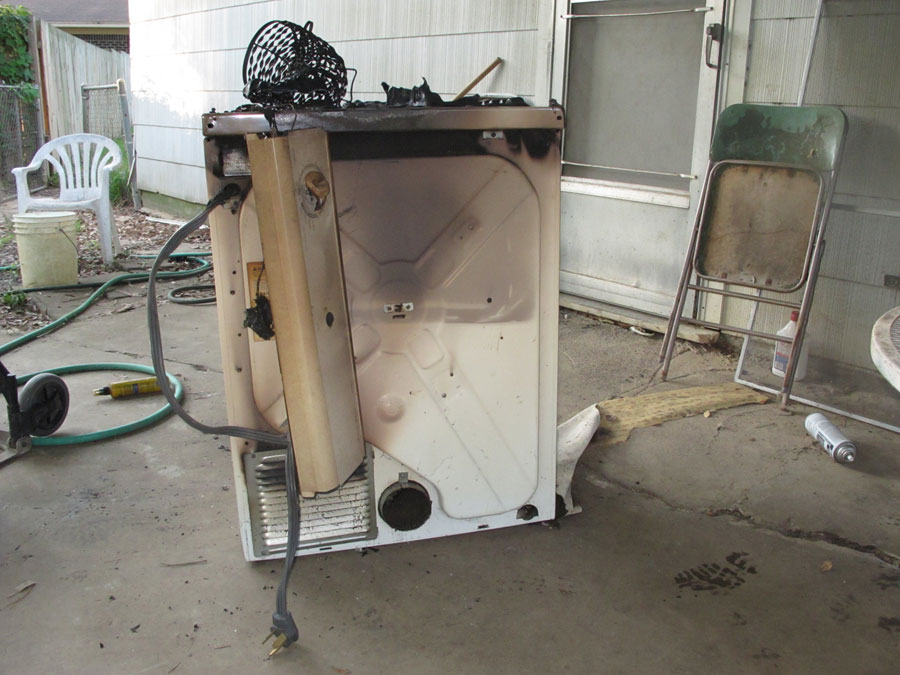
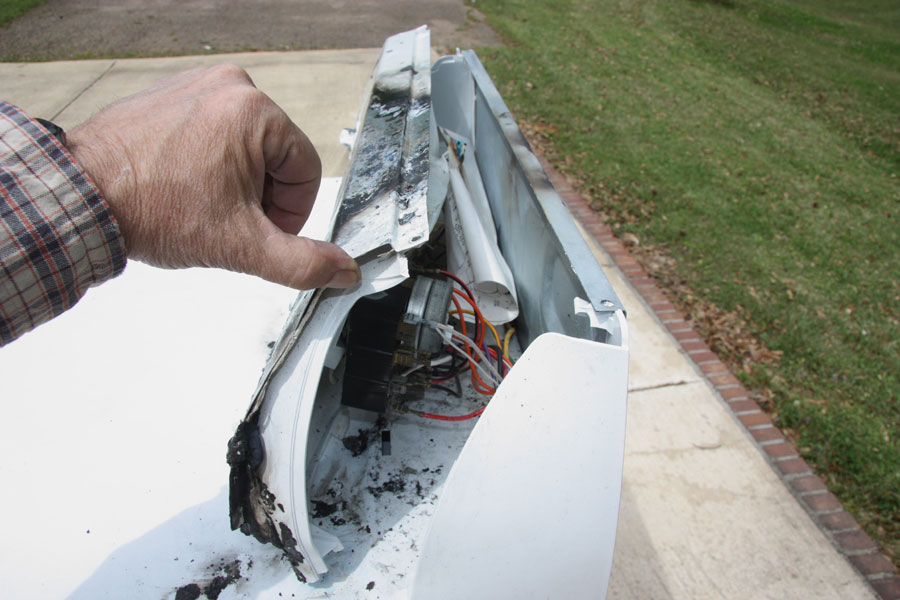
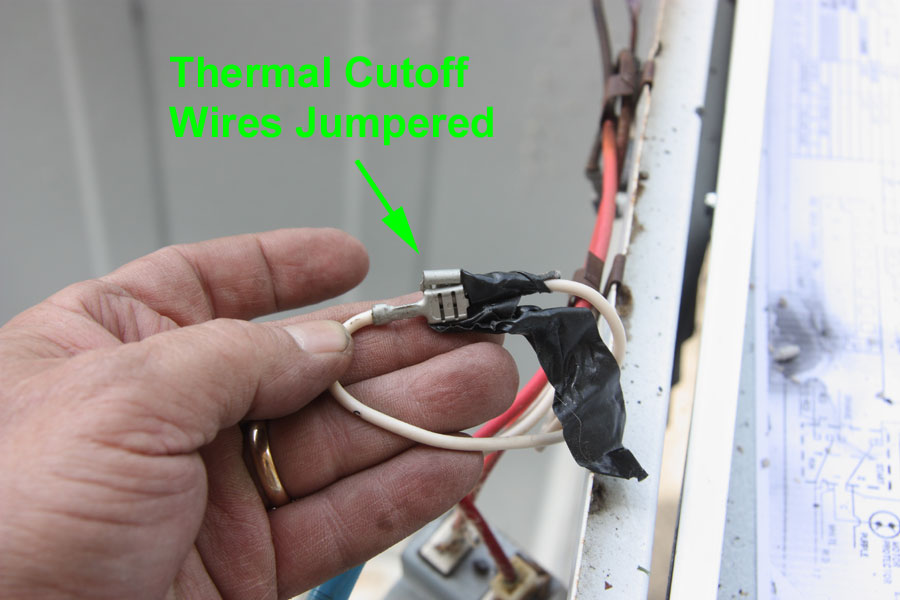
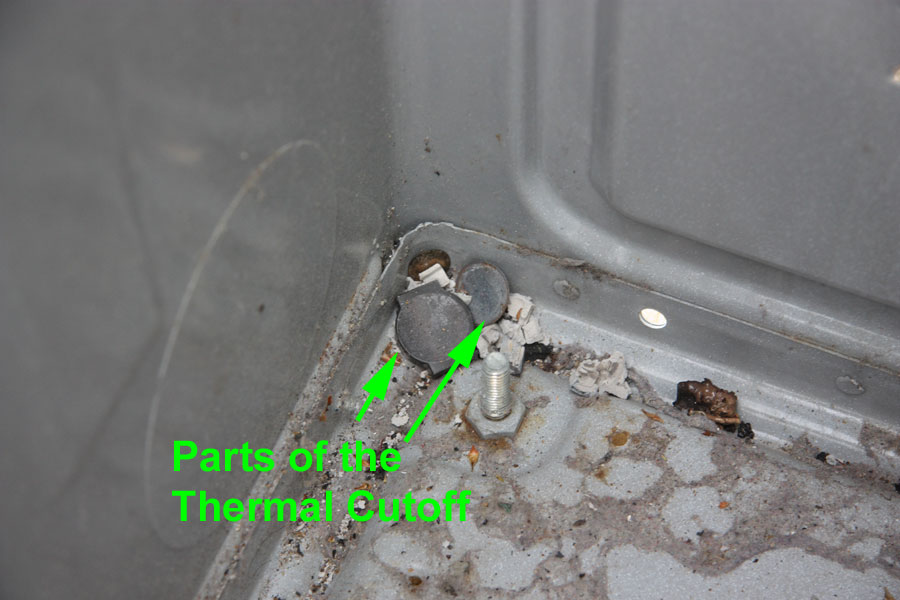
On January 3, 2019, my wife said, "The dryer is turning, but it will not heat". Upon investigating, I found the thermal cutoff, which is a non-resettable part, had activated. I knew that there had to be a reason that it activated. The culvert was PCV pipe going to the outside vent. It was packed with tint. It had only been 17 years since I cleaned it. After cleaning the outside vent pipe. I told my wife, I had to order a part. She said, "She needed her clothes dry"! As an electrical engineer that investigates dryer fires and testifies as an expert witness, I knew better, but I bypassed the thermal cutoff. I told her to be very carefully, and not to leave the house with the dryer on. She thought I was a genius; the truth is I was stupid for bypassing the manufacturer's safety device. Furthermore, I know now that when the thermal fuse melts, the contacts on the high limit thermostat are usually welded together! I have seen more than one fire occur because someone bypassed the thermal fuse, and they never got around to replacing it. On some dryers, you have to take the drum out to get to it. Who wants to disassemble and reassemble a dryer - twice!
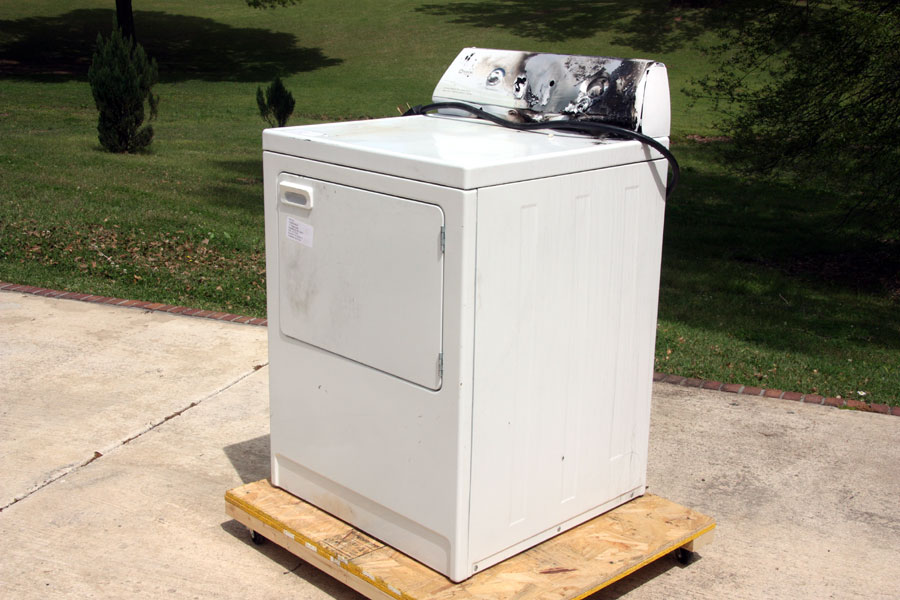
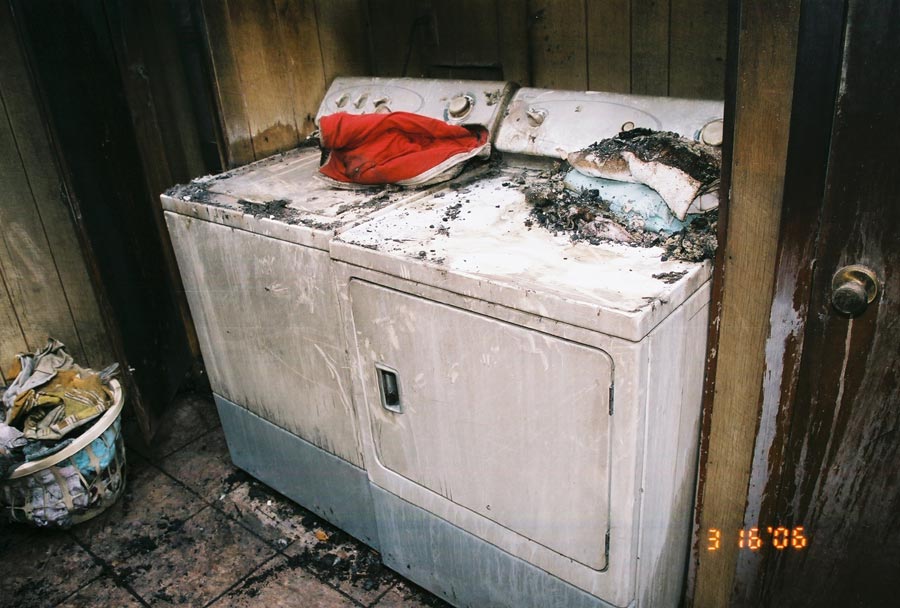
For Maximum Resolution, Click on the Body of the Picture.
On January 5, 2019, my dryer stopped turning. This time, it was thermal fuse next to operational thermostat. This fuse would not have melted unless the operational thermostat had stuck. It had been in service for 25 years, so it was time to replace it.
For Maximum Resolution, Click on the Body of the Picture.
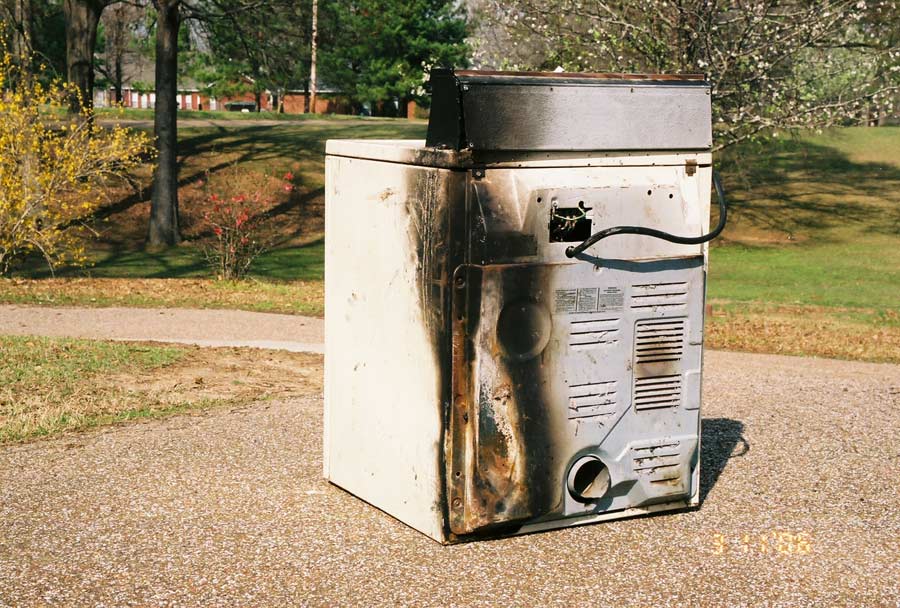
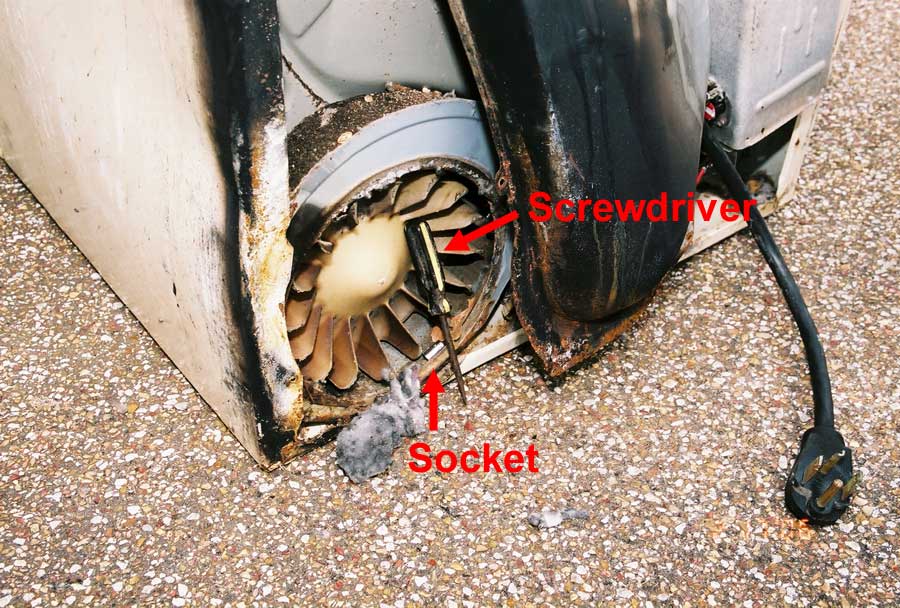
The insurance adjuster told me this Kenmore/Whirlpool dryer was only four years old. When I asked the homeowner how old the dryer was, she said it was four years old. When I asked her where she got it, she said at a garage sale. The dryer was 23 years old. I believe there had been a previous fire in this dyer. Five of the wires in the bottom on the dryer were spliced. The female spade connectors were not properly crimped to the wires. This resulted in a loose connection, which caused resistive heating. After four years of use, the resistive heating ignited lint in the dryer.
For Maximum Resolution, Click on the Body of the Picture.


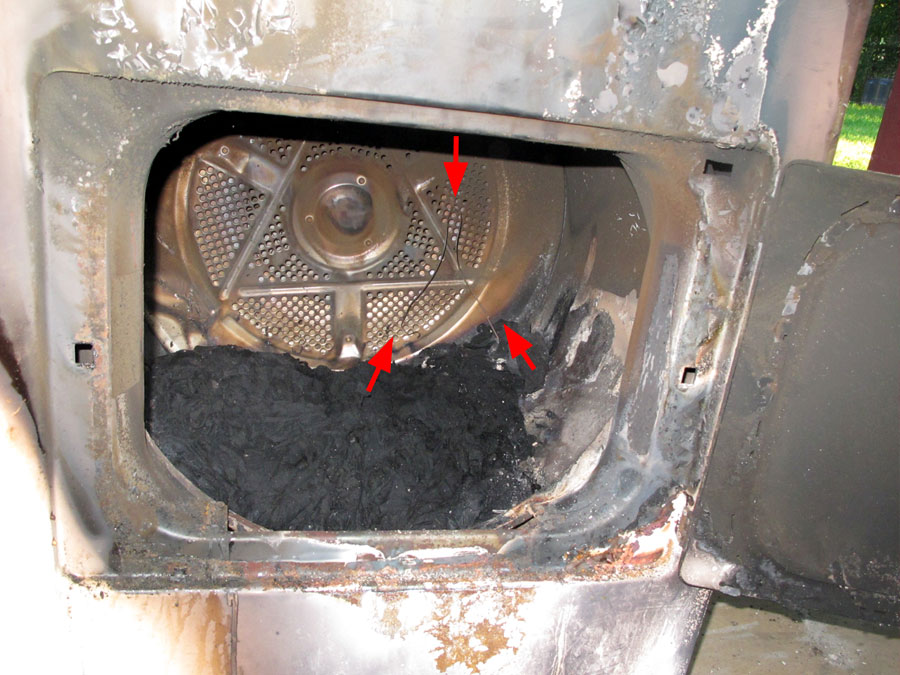
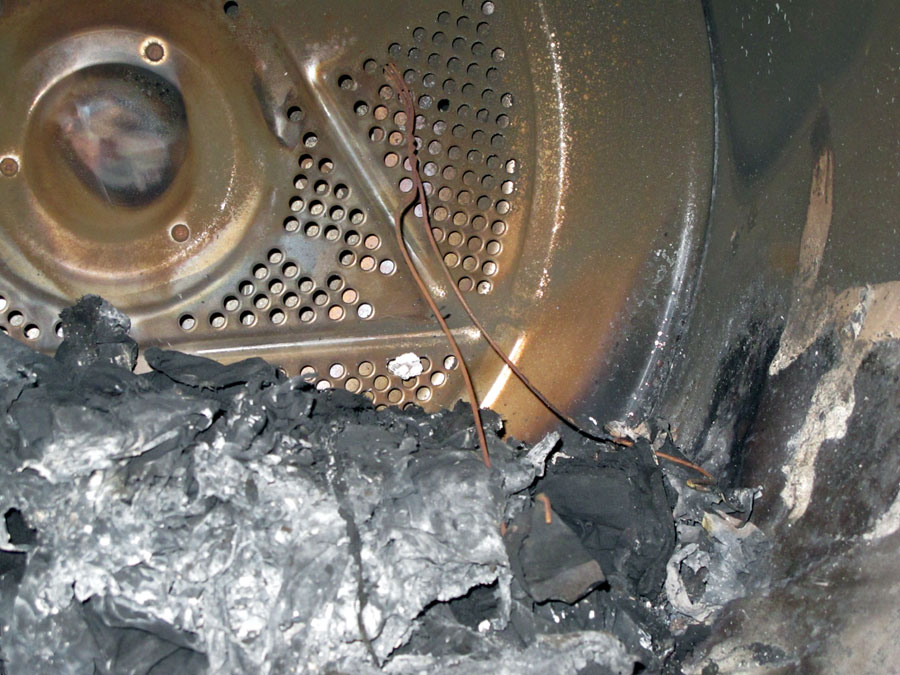
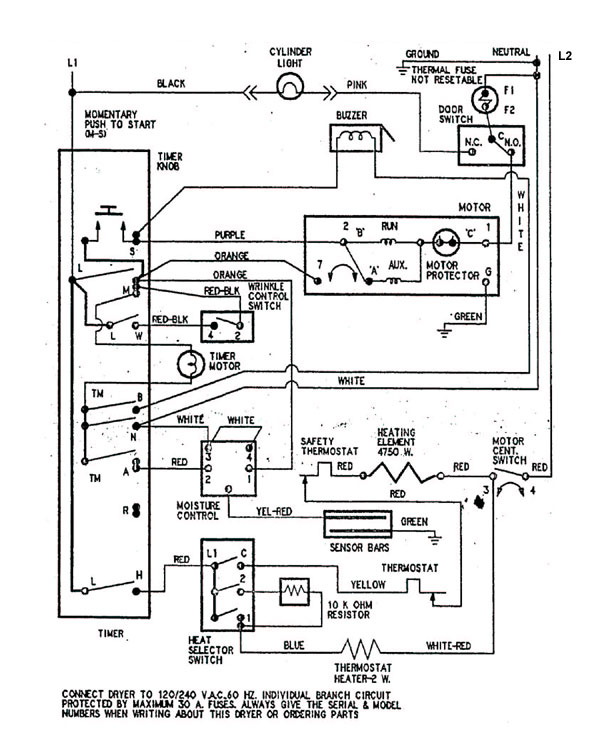
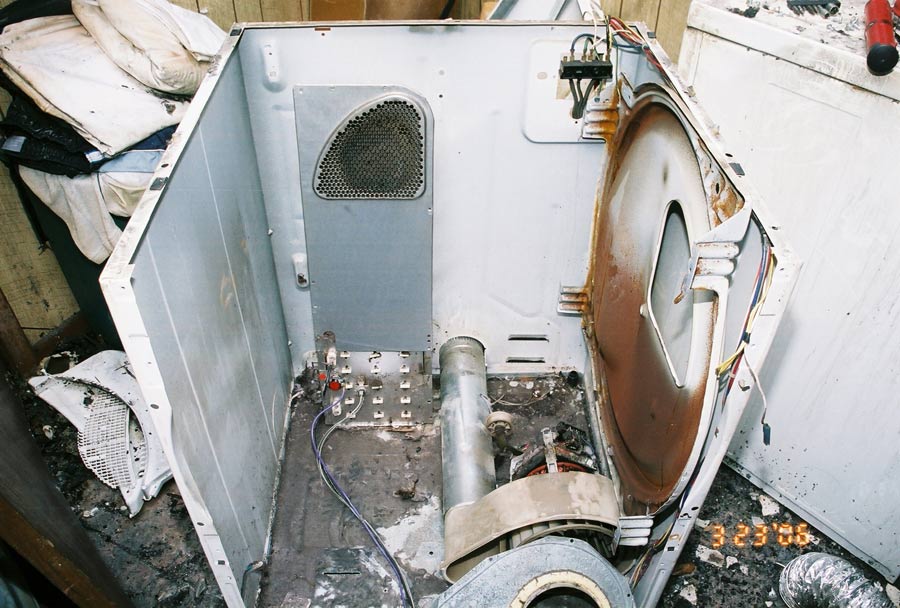
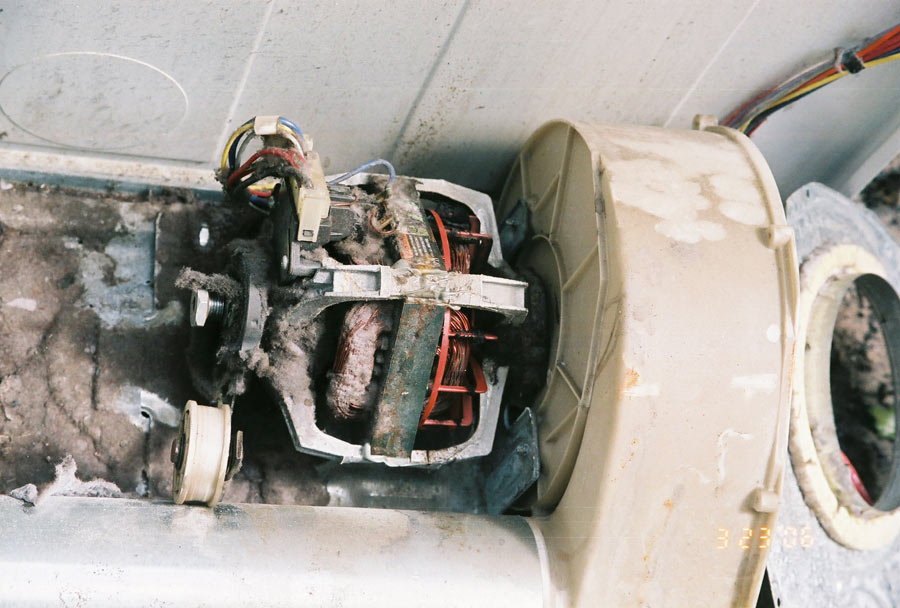
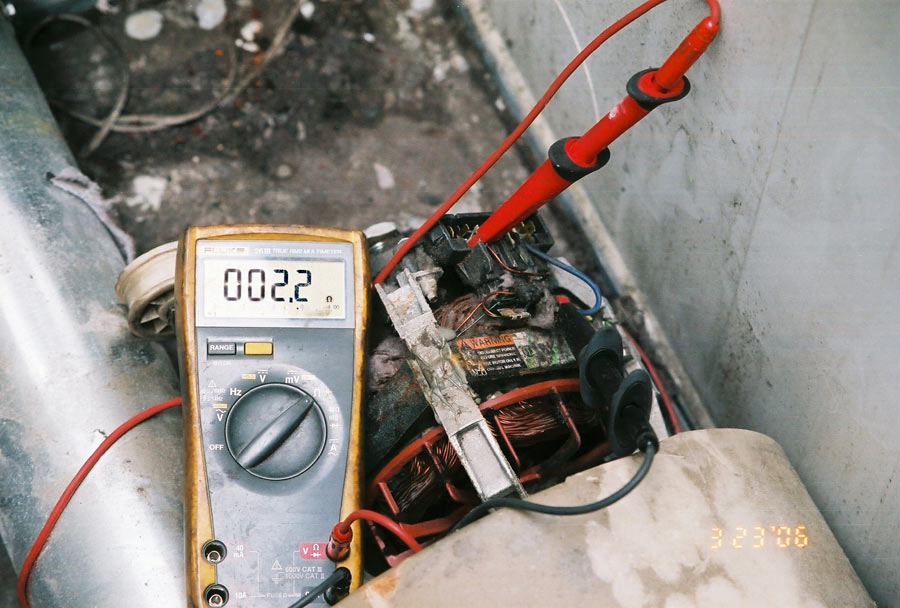
The insurance adjuster told me "Not to do an inspection of this dryer - to just pick it up for an evidence examination". I did just that. I shrink wrapped the dryer and brought it to my place. I felt like a fool when we opened the dryer, and there was a steel coat hanger in the drum with a load of clothes. You would think that an electrical engineer with a Ph.D., would know better. The dryer was manufactured in 2007 by Frigidaire, Model No.: FER3111FS, Serial No.: XD72207921. Electrical Schematic. This dryer is included in the 2014 Electrolux Class Action Lawsuit Settlement, and all of the included Electrolux dyer have a drum similar to the drum in this dryer.
For Maximum Resolution, Click on the Body of the Picture.
In December 2008, lint build-up and a bypassed thermal cutoff caused a dryer fire. Clothes and wood paneling in the laundry room caught fire. The operational thermostat for the Maytag dryer was located near the bottom of the dryer on the exhaust vent. With lint clogging the exhaust, there was no air circulation, and hence, no hot air for the operational thermostat to monitor. The only thing regulating the temperature was the high limit thermostat at the heater box. The high limit thermostat is an overload device; it is not designed for millions of operations. Eventually, the contacts on the high limit thermostat became welded together. The only other safety device was the thermal cutoff. Apparently, this was not the first time this dryer had been clogged with lint. In fact, the thermal cutoff had previously activated. To get the dryer to work, they bypassed the thermal cutoff. Because they failed to replay the thermal cutoff, a fire occurred. You cannot blame fires like this on the manufacturer. The insurance company was disappointed, but they knew they didn't have a subrogation case against the manufacturer. According to the homeowner, the dryer had never been worked on.
For Maximum Resolution, Click on the Body of the Picture.


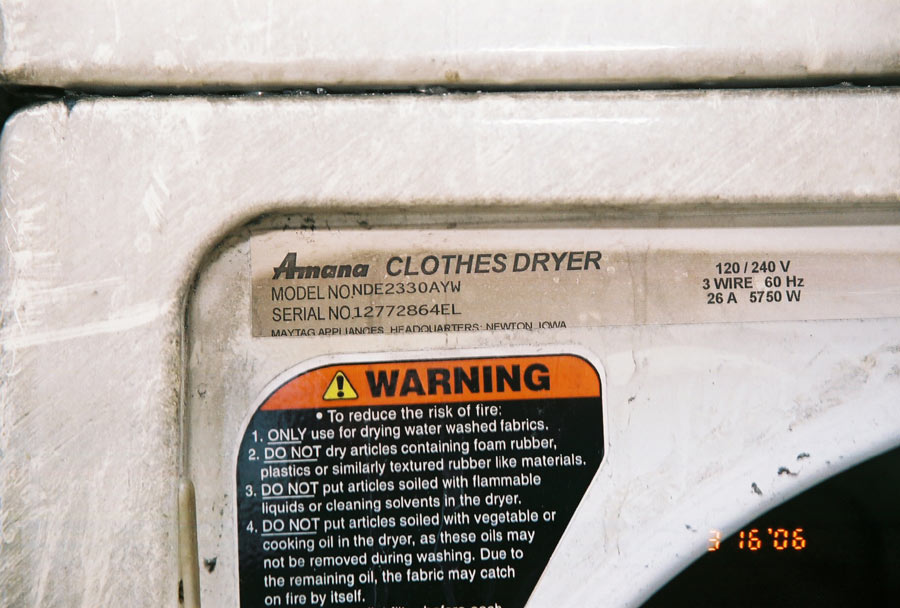
This Amana dryer was being used when a fire was discovered in the carport. The laundry room is adjacent to the carport. The electric service entrance, meterbase, and two electrical distribution panels were in the carport. The cause of this fire is believed to be a recalled cruise control deactivation switch on a Ford Expedition. Since the dryer was in use at the time of the fire and the cable that powered it passed through the attic of the carport, it was necessary to have an electrical engineer rule out the dryer and that a fault in the drying did not cause the cable powering the dryer to overheat and catch fire.
For Maximum Resolution, Click on the Body of the Picture.
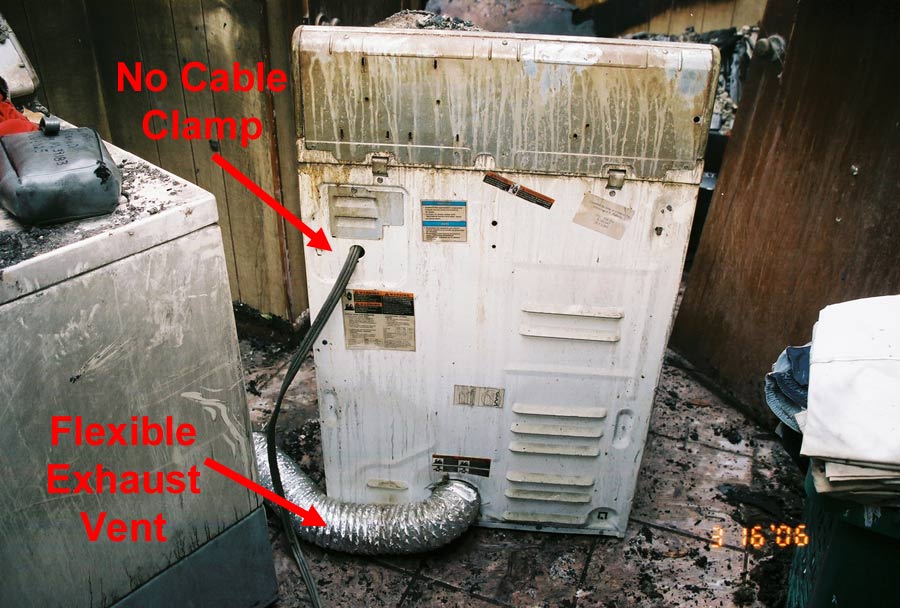
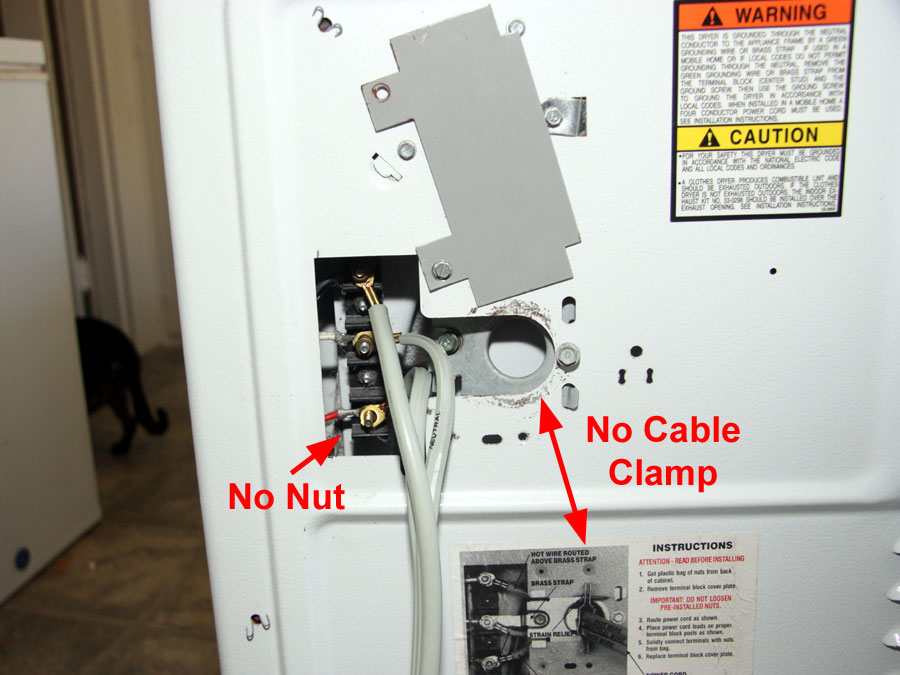
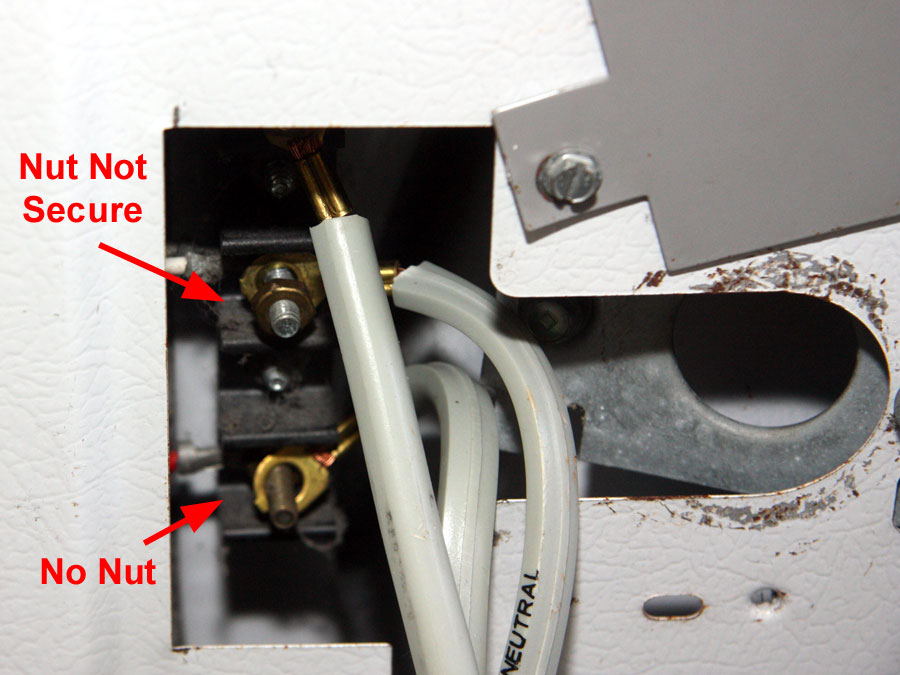
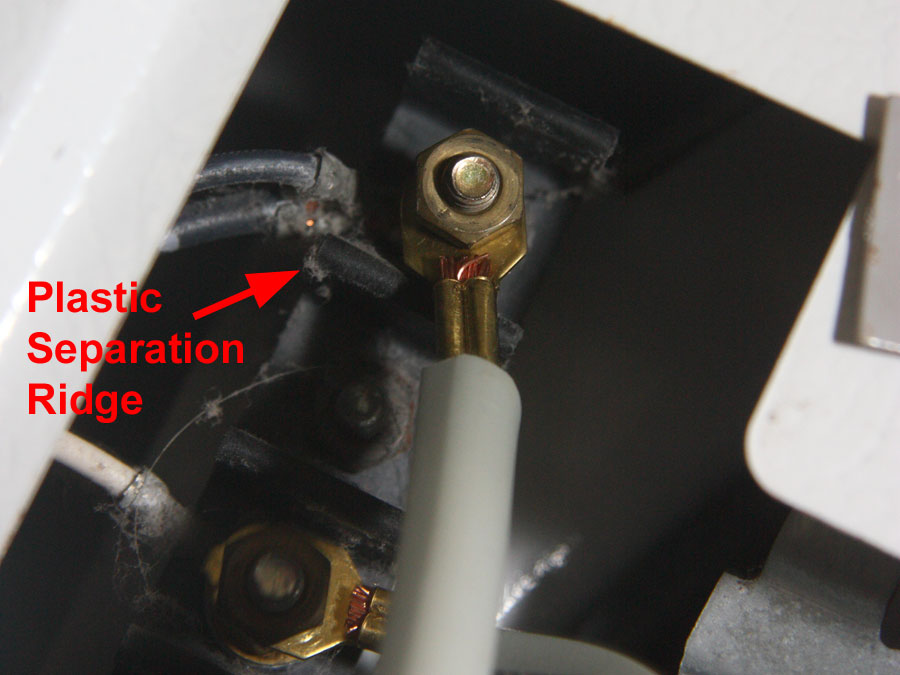
To prevent wire chaffing, where the cable enters the frame of the dryer, there should be a metal cable clamp with smooth edges. However, they are often not installed or installed improperly. In 1996, the National Electrical Code (NEC) changed the requirement for dryer receptacles from a 3-slot to a 4-slot receptacle with a separate, safety ground-wire. The change was for new homes built after 1996. This change affected the dryer power cord. If the dryer was being installed in a home built before 1996, it needed a 3-wire cable with a 3-prong plug, and if it was being installed in home built after 1996, it needed a 4-wire cable with a 4-prong plug. This stopped the dryer manufacturers from connecting or supplying a power cable with the dryer. Instead, they sold separate kits for the dryer power cable, and they allowed the retailer to charge for installing the dryer power cable. To save money the dryer owner could purchase a dyer cable from Wal-Mart, Home Depot, Lowe's, etc. and install it himself. The dryer cable sometimes comes with the cable clamp around the cable. However, the clamp must be removed from the cable and installed in the frame of the dryer before the screw connections are made to dryer. This often does not occur because the installer is primarily concerned with which wire goes to which terminal. It's only after the connections have been made, that he realizes that he should have removed the clamp from the cable and installed it first. The inexperienced installer often does not properly connect or torque the connections to the dryer. I've actually seen power connection to a dryer resting on the screw without a nut to secure the connection.
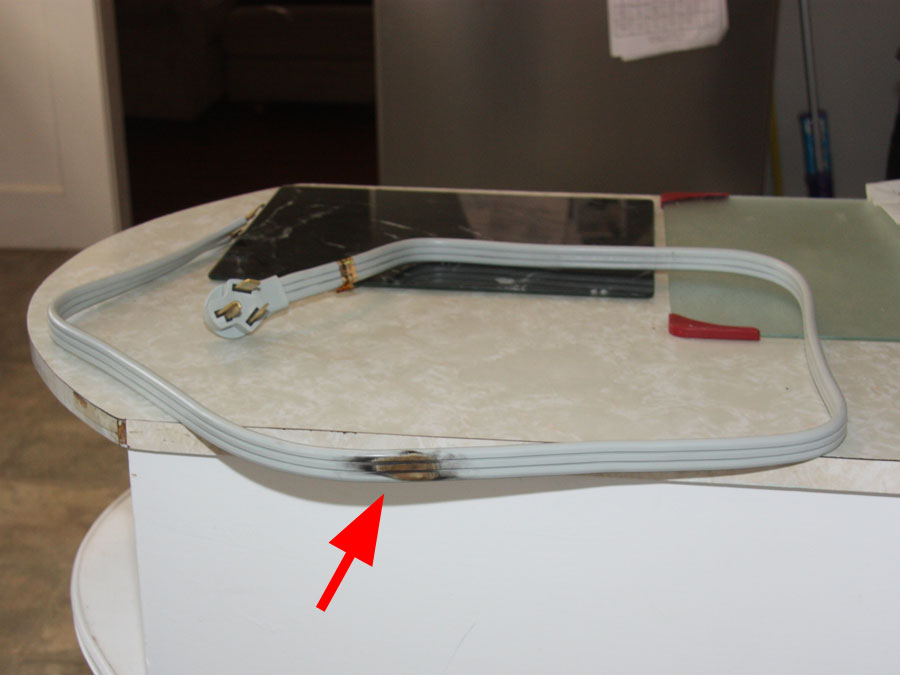
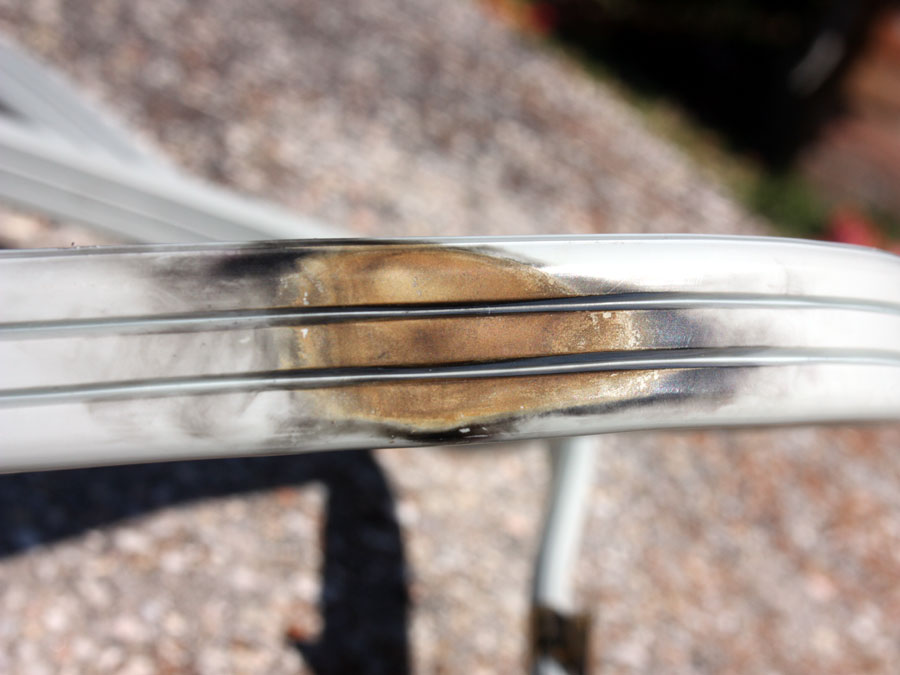
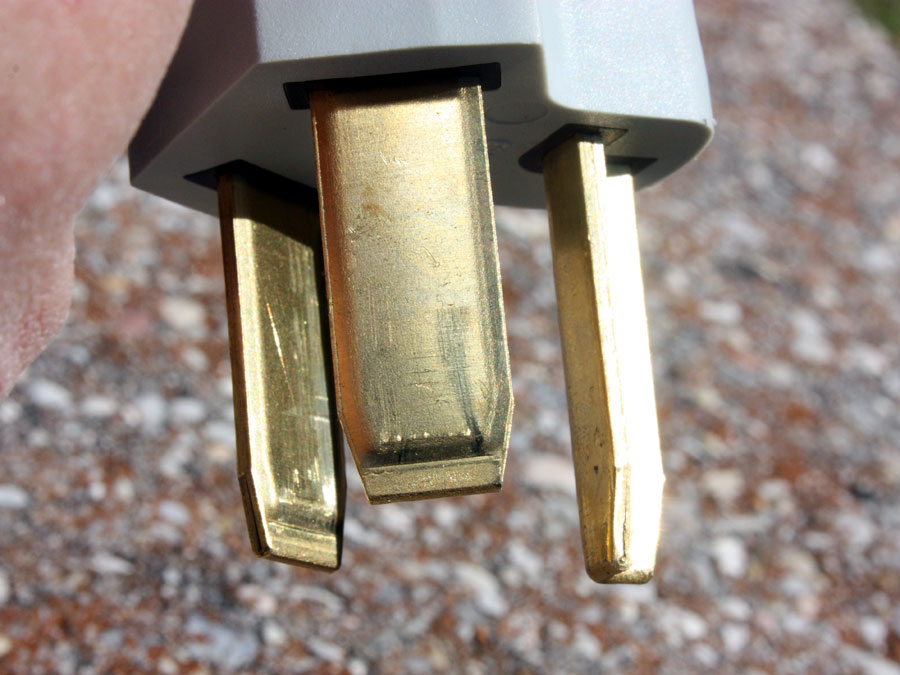
I do not always work for the homeowner's insurance company. On this case, I was working for an adjusting company that represented the manufacturer of the dryer cable. A young couple purchased a new dryer and attempted to install the cable themselves. The wife purchased the dryer cable from Lowe's. When she got home, she made sure she had the right cable. She put the plug of the dryer cable close to, but not touching, the dryer receptacle. She also made sure that the lugs on the other end of the cable were separated and not touching. Supposedly, electricity jumped out of the receptacle and onto the plug. The force of the electric current was such that it went through the cable and arced across the separated lugs on the other end of the cable. It partially melted the copper lugs (over 1980°F). The heat generated by the electrical current damaged the wire insulation and burned her hand.
For Maximum Resolution, Click on the Body of the Picture.

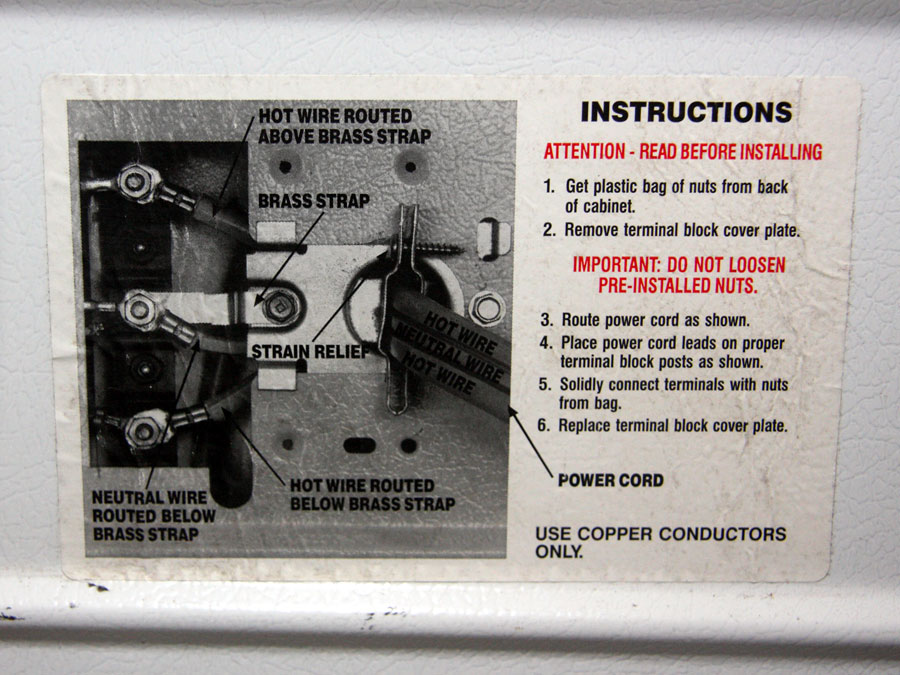
The husband purchased a new dryer cord, and he installed it himself. Even if he could not read, you would think that he would at least look at the picture on the back of dryer. The power cord was not routed correctly, and the cable clamp (strain release) was still in the sealed plastic bag. Not one of three terminals was properly connected to back of the dryer. When I asked him where the missing terminal nut was, he said that it fell into the frame of the dryer. Needless to say, I advised this couple to hire an electrician.
Overheated Clothes Dryers Can Cause Fires - U.S. Consumer Product Safety Commission
Electric Clothes Dryer Meeting 2003 July 29 - U.S. Consumer Product Safety Commission
UL 2158 - Electric Clothes Dryers - Scope
UL 2158 - Electric Clothes Dryers - Table of Contents
NFPA - Home Fires Involving Clothes Dryer or Washing Machines - J.R. Hall - 2012 September
© Copyright Dr. Ray Franco, PhD, PE | 2006-2021. All rights reserved.